AxleSynck Download
AxleSynck › Tutorials

Learn AxleSynck step by step

Every function explained on the real screens, with numbered callouts. Search what you want to do, or pick a topic from the list.

25 guides41 annotated screens184 numbered callouts
Part 1 · 3 guides

Getting started

Getting started#

Install AxleSynck and connect to Tally

AxleSynck runs on Windows 10 / 11 beside Tally. It reads and posts data through Tally's own connection, so nothing is installed inside Tally.

You needWindows 10 or 11Tally with your company open
  1. Install

    On axlesynck.in click Download, then Download from the Microsoft Store, and click Get in the Microsoft Store. It installs by itself.

  2. Open your company in Tally

    AxleSynck talks to Tally on port 9000. In Tally check F1 > Settings > Connectivity: Tally should act as Server (or Both) on port 9000.

  3. Start AxleSynck

    The open Tally company shows at the top with a green dot, and the status bar says Connected. Pick the financial year in the FY box at the top.

  4. Tally on another computer, or on cloud?

    Open Settings > Tally connection and choose where Tally runs. On another computer of my office network: type that computer's IP address (or name) and the port, click Test connection, then Save & reconnect. On a cloud computer: see Tally on cloud. Use this computer (default) puts it back to this PC, port 9000.
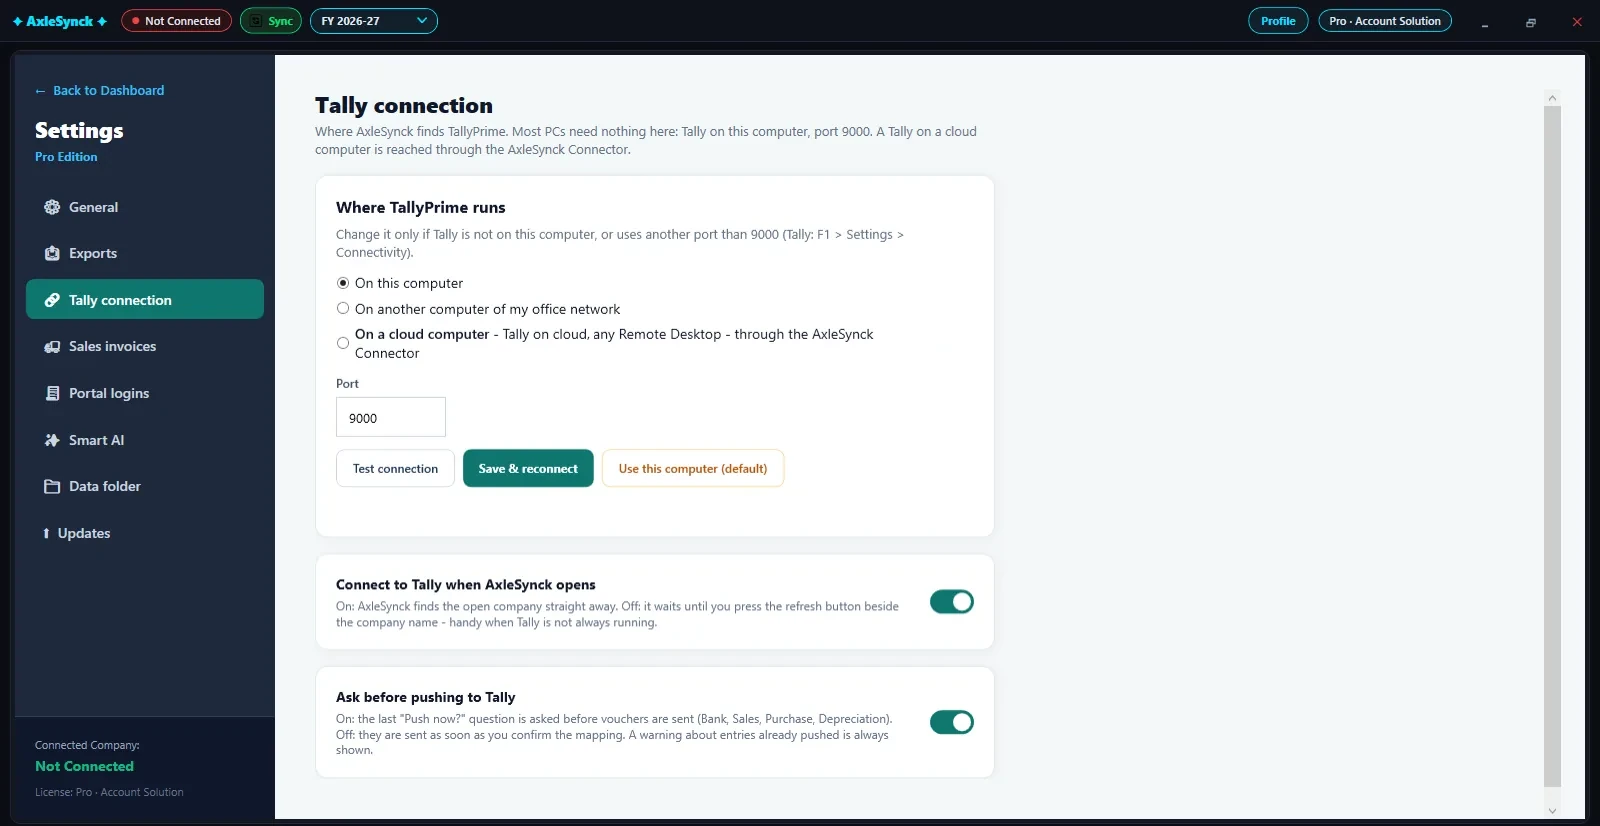
AxleSynck: Settings > Tally connection
Settings > Tally connection
  1. 1Where Tally runs: on this computer, on another computer of your office network, or on a cloud computer
  2. 2Port: 9000 unless Tally uses another one
  3. 3Test connection: checks that Tally answers
  4. 4Save & reconnect
  5. 5Connect to Tally when AxleSynck opens
  6. 6Ask before pushing to Tally: one last confirmation before vouchers are sent

Keep Tally open with the company loaded whenever you fetch from or push to Tally.
Getting started#

Tally on cloud: the AxleSynck Connector

When Tally runs on a cloud computer or a Remote Desktop server, the free AxleSynck Connector links it to AxleSynck on your PC. No VPN and no ports to open; it takes about five minutes, once.

You needAxleSynck 2.9.0 or laterYour AxleSynck username and passwordA web browser on the cloud computerInternet on both computers
  1. On the cloud computer: get the connector

    Open Tally there with your company. Open the cloud computer's web browser and go to connect.axlesynck.in, or paste the link from Copy link in AxleSynck. Download the connector and open it from the browser's download list. Windows may ask whether to run it: choose Run (or More info > Run anyway).

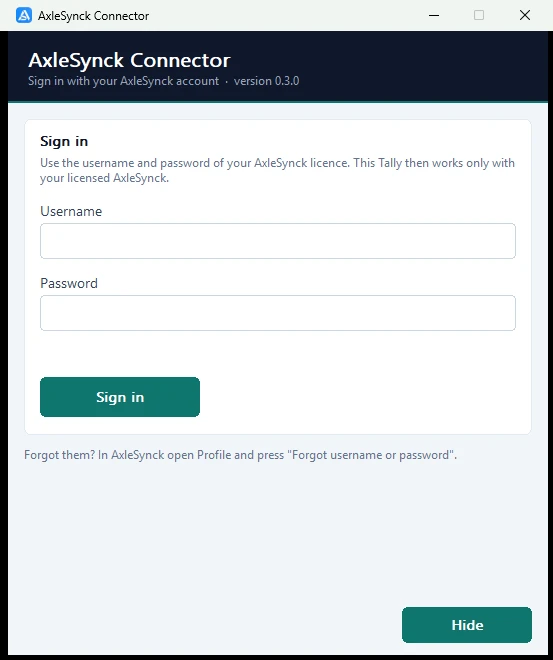
  2. Sign in to the connector

    Type your AxleSynck username and password - the ones of your licence - and press Sign in. The connector finds Tally by itself and checks your licence once a day; it works only with your own licensed AxleSynck. Keep it running while you work - minimised or next to the clock is fine.

  3. On your PC: pick that computer

    Open Settings > Tally connection, choose AxleSynck Connector and press Refresh. Every computer where the connector is signed in to your account is listed by name: pick the cloud computer. Nothing to copy or type.

  4. Test and save

    Test connection shows the connector and your open company. Then Save & reconnect, and press Sync once to bring the ledgers and stock items. Every screen now works with the cloud Tally.

The AxleSynck Connector on the cloud computer, asking for the AxleSynck username and password
AxleSynck Connector 0.3.0: sign in on the cloud computer
  1. 1Username of your AxleSynck licence
  2. 2Its password
  3. 3Sign in: the connector now serves only your licensed AxleSynck

Signed in on a computer you no longer use? Open the connector there and press Sign out in its Settings: AxleSynck can then no longer reach that Tally.

If something is not right

  1. "The AxleSynck Connector is not running"

    Open the connector on the cloud computer, then try again. If it did not start by itself, open it again from the browser's download list.

  2. The connector says "Tally was not found"

    Open Tally on the cloud computer. In Tally, F1 > Settings > Connectivity should have Tally acting as Server or Both (or ODBC switched on), port 9000; restart Tally after changing it.

  3. The connector says "Licence is not active"

    No AxleSynck licence on your account is active. Renew it, and the connector works again within the hour. If it cannot reach our licence server, it keeps working for 3 days on its last check.

  4. "Download the new AxleSynck Connector"

    An older connector (with a pairing code) no longer works. Download 0.3.0 from connect.axlesynck.in/download on the cloud computer and sign in.

  5. A push was cut short

    If AxleSynck, Tally, the connector, the internet or a computer stops in the middle of a push, AxleSynck checks that push against Tally the next time the company is open and tells you how many entries went in. Push History > Sync report keeps every push.

Getting started#

Activate your licence (and find a lost key)

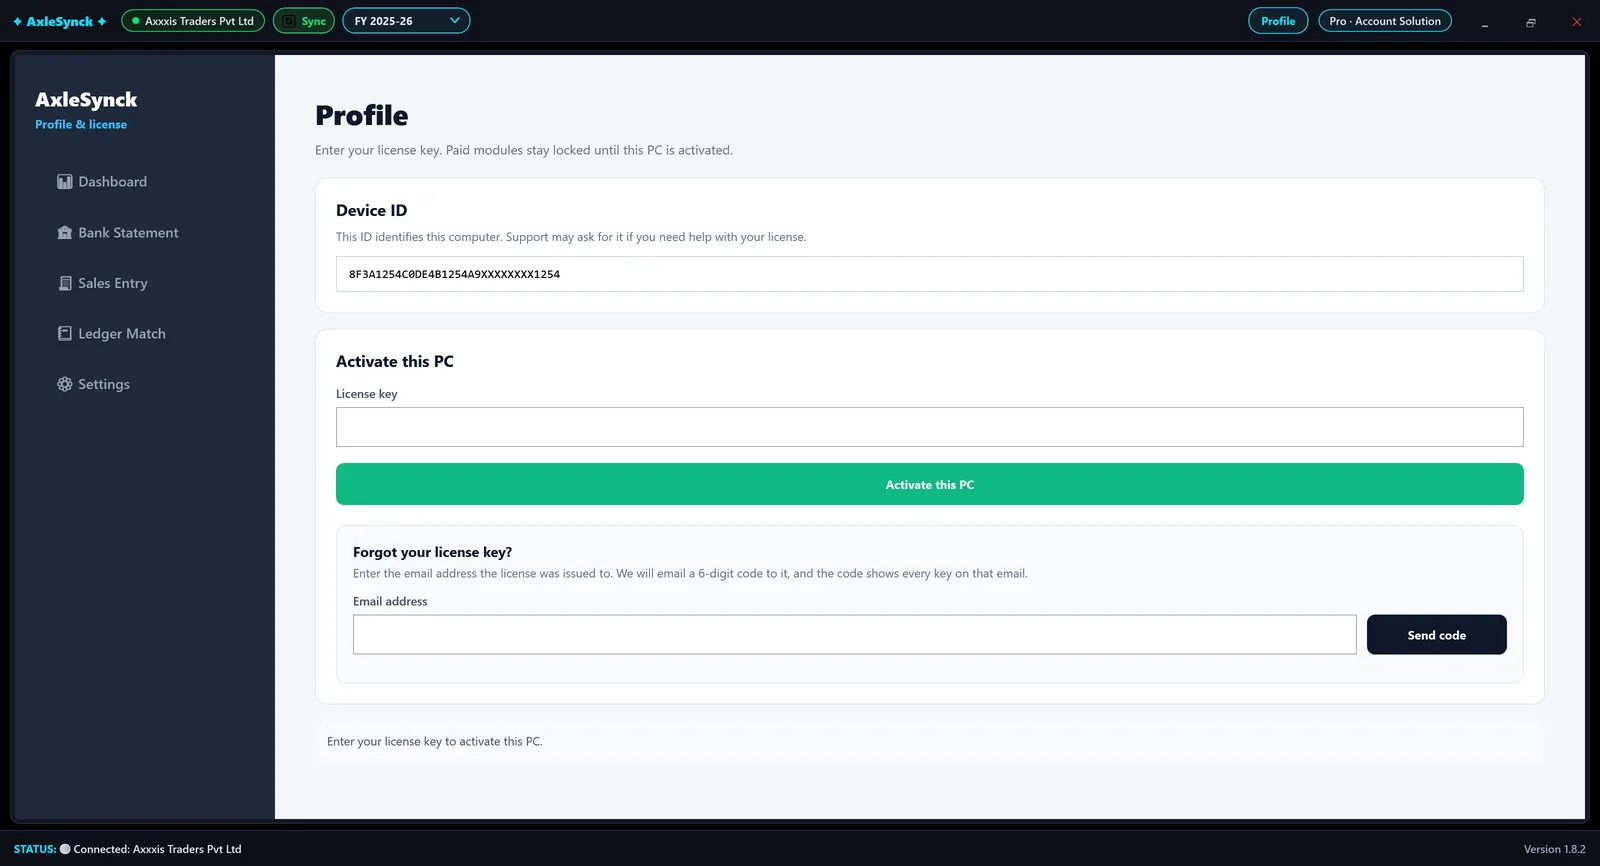
Paid modules unlock once this PC is activated with your licence key. No licence yet? Start the free trial on the same screen. Lost the key? AxleSynck can email you a code that shows every key on your email address.

You needYour licence key, or the email address the licence was issued to
  1. Open Profile

    Click Profile at the top right.

  2. Activate

    Under Already have a license key? click Activate with my key. Paste the key in License key, sign in with your AxleSynck username and password (or click Create account), then click Activate this PC. The licence details (edition, seats, expiry) appear.

  3. Forgot the key?

    Under Forgot your license key? type the email address the licence was issued to and click Send code. Enter the 6-digit code from the email (it expires in 10 minutes, check Spam too), click Show my key, then Use this key.

  4. Moving to another PC

    Click Remove license from this PC first, then activate on the new computer.

AxleSynck: Profile: activate this PC
Profile: activate this PC
  1. 1Profile button
  2. 2License key
  3. 3Activate this PC
  4. 4Email the licence was issued to
  5. 5Send code: emails a 6-digit code
  6. 6Device ID: support may ask for it

Standard includes Bank Statement. Pro adds Sales, Purchase, Depreciation, Delivery Challan, Ledger Match, GST Reconciliation and TDS Reconciliation.

No licence yet? Under Get started click Start free trial, fill in your details and enter the 6-digit code we email you. The trial runs for 1 day with every module, with limits (10 Tally entries per module, sample Excel files, one GST month, five TDS parties), once per PC. Need help? WhatsApp us.

Getting started#

The dashboard, company and financial year

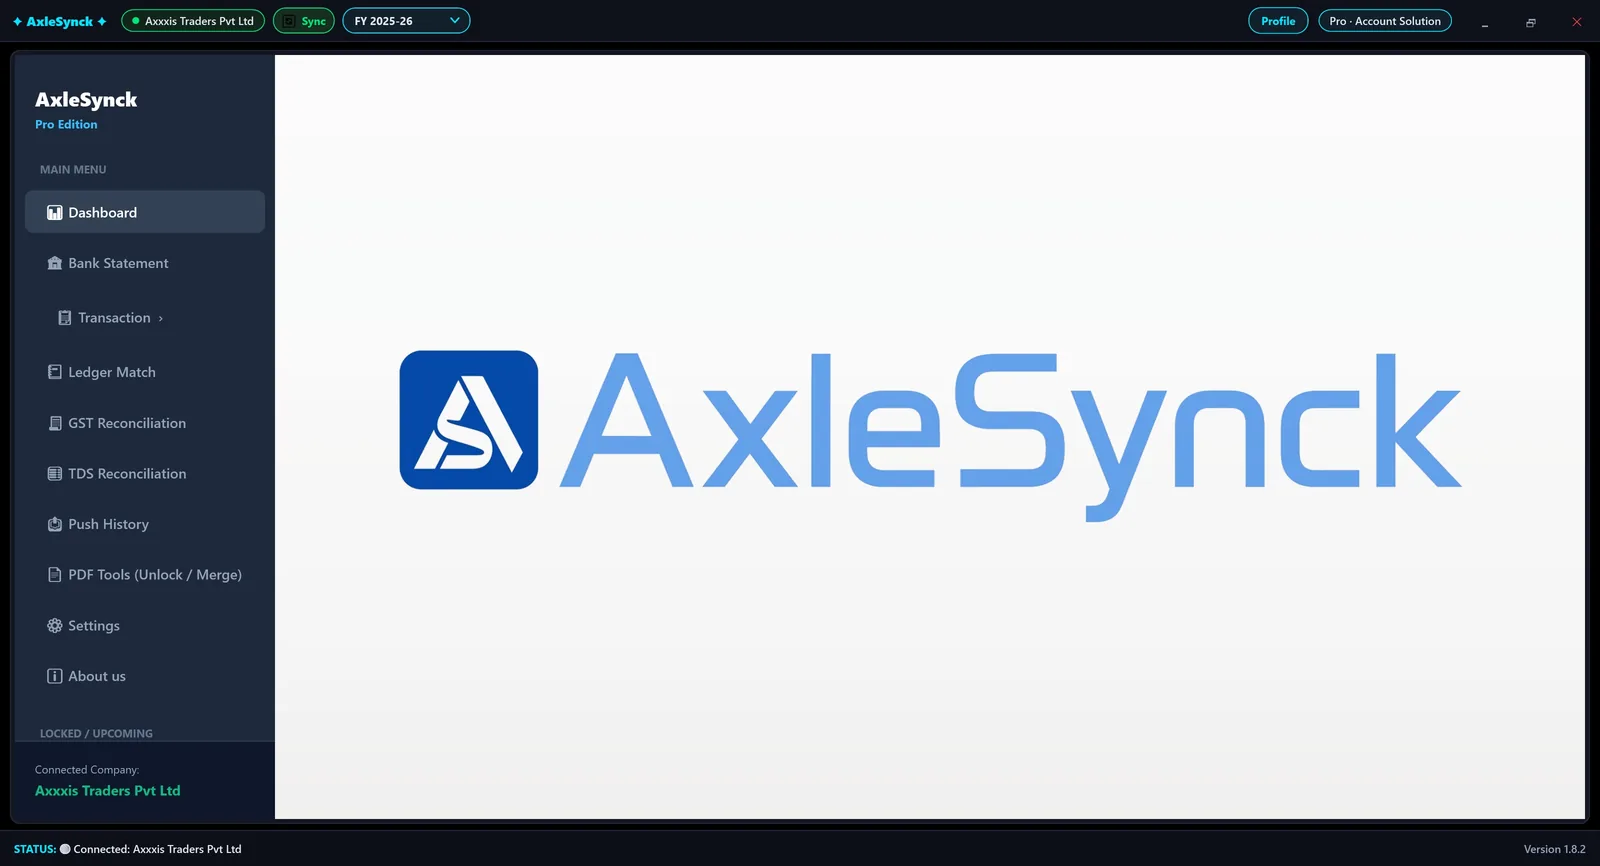
Everything starts from the dashboard. The bar at the top shows which Tally company you are working on and which financial year.

  1. Check the company

    The green chip at the top is the company open in Tally. Every fetch and push goes to this company.

  2. Sync masters

    Sync reads the company's ledgers and stock items from Tally, so they can be picked in every module.

  3. Pick the year

    The FY box sets the financial year for every screen.

  4. Open a module

    Use the main menu: Bank Statement, Transaction (Sales, Purchase, Depreciation, Delivery Challan), Ledger Match, GST and TDS Reconciliation, Push History, PDF Tools, Settings.

AxleSynck: The dashboard
The dashboard
  1. 1Connected Tally company
  2. 2Sync ledgers and items from Tally
  3. 3Financial year
  4. 4Bank Statement
  5. 5Transaction: Sales, Purchase, Depreciation, Delivery Challan
  6. 6GST Reconciliation
  7. 7TDS Reconciliation
  8. 8Push History: edit or undo a push
  9. 9Profile & licence
Part 2 · 3 guides

Bank statement

Bank statement#

Import a bank statement (PDF, Excel or CSV)

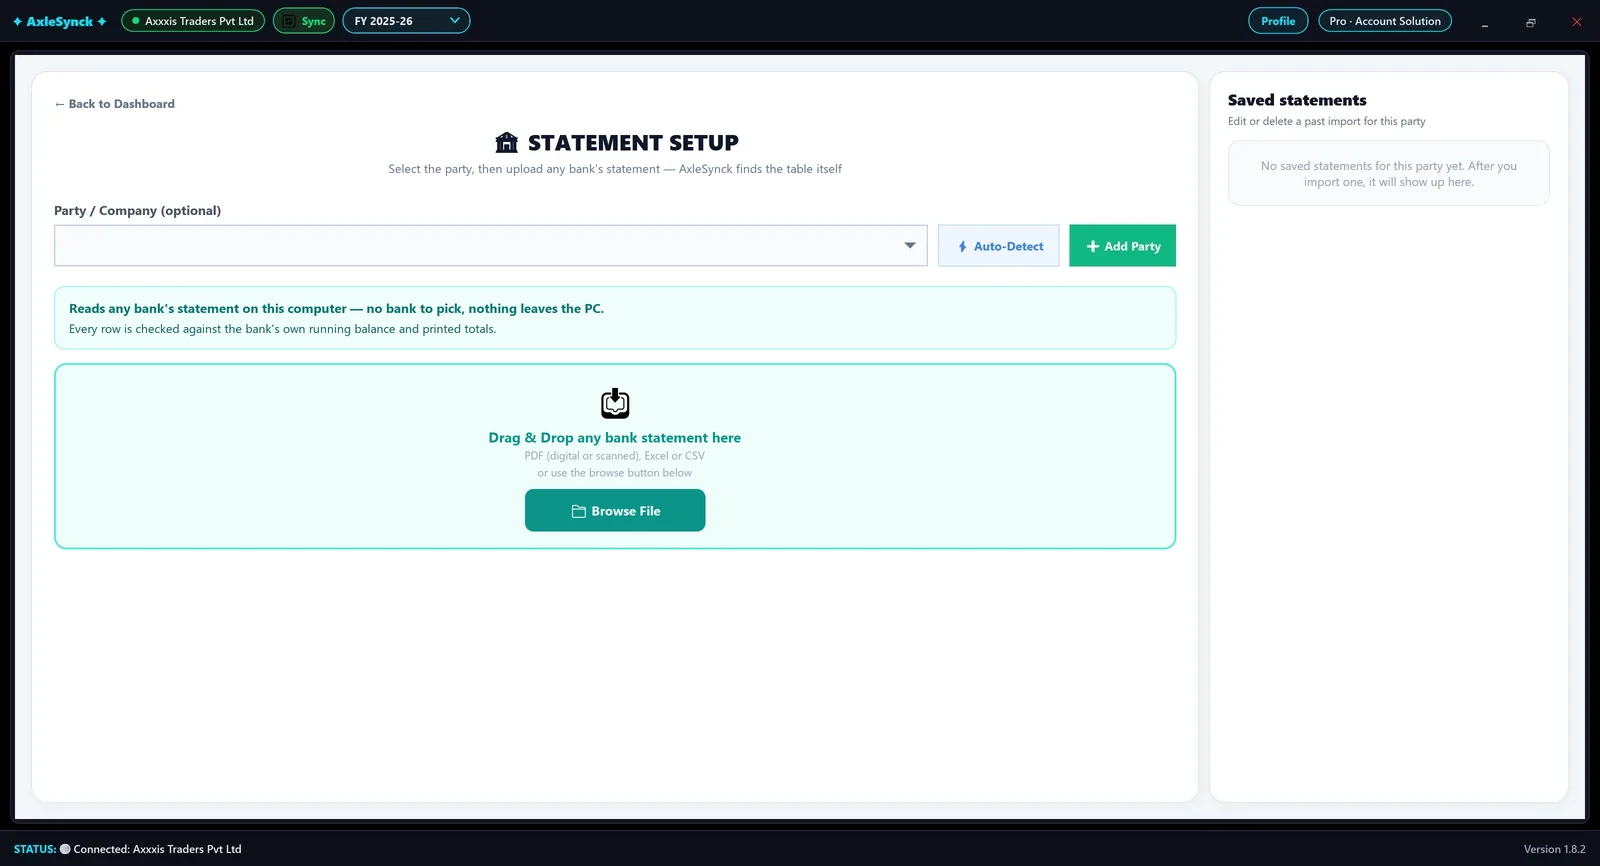
Drop the statement and AxleSynck reads every line: date, narration, cheque/reference, debit, credit and balance. One reader works for every bank, on your own PC: there is no bank to pick and no template to build.

You needBank Statement module (Standard or Pro)
  1. Open Bank Statement

    From the dashboard click Bank Statement.

  2. Party / Company

    Optional: pick a saved party, or click Auto-Detect to use the company open in Tally. Add Party saves a party, and its ledger mappings are kept for it alone.

  3. Add the file

    Drag & drop the PDF, Excel or CSV, or click Browse File. Many scanned PDFs are read too. A password-protected PDF asks for its password. Every row is checked against the bank's running balance.

  4. A row needs a fix?

    Right-click it to set its narration lines right, correct an amount or name the columns. The layout is remembered for next time.

AxleSynck: Bank Statement > Statement setup
Bank Statement > Statement setup
  1. 1Party / Company (optional)
  2. 2Auto-Detect the Tally company
  3. 3Add Party
  4. 4One reader for every bank, on this PC: no bank to pick
  5. 5Browse File, or drop the file on this box
  6. 6Saved statements: edit or delete a past import
Bank statement#

Check the rows and map ledgers

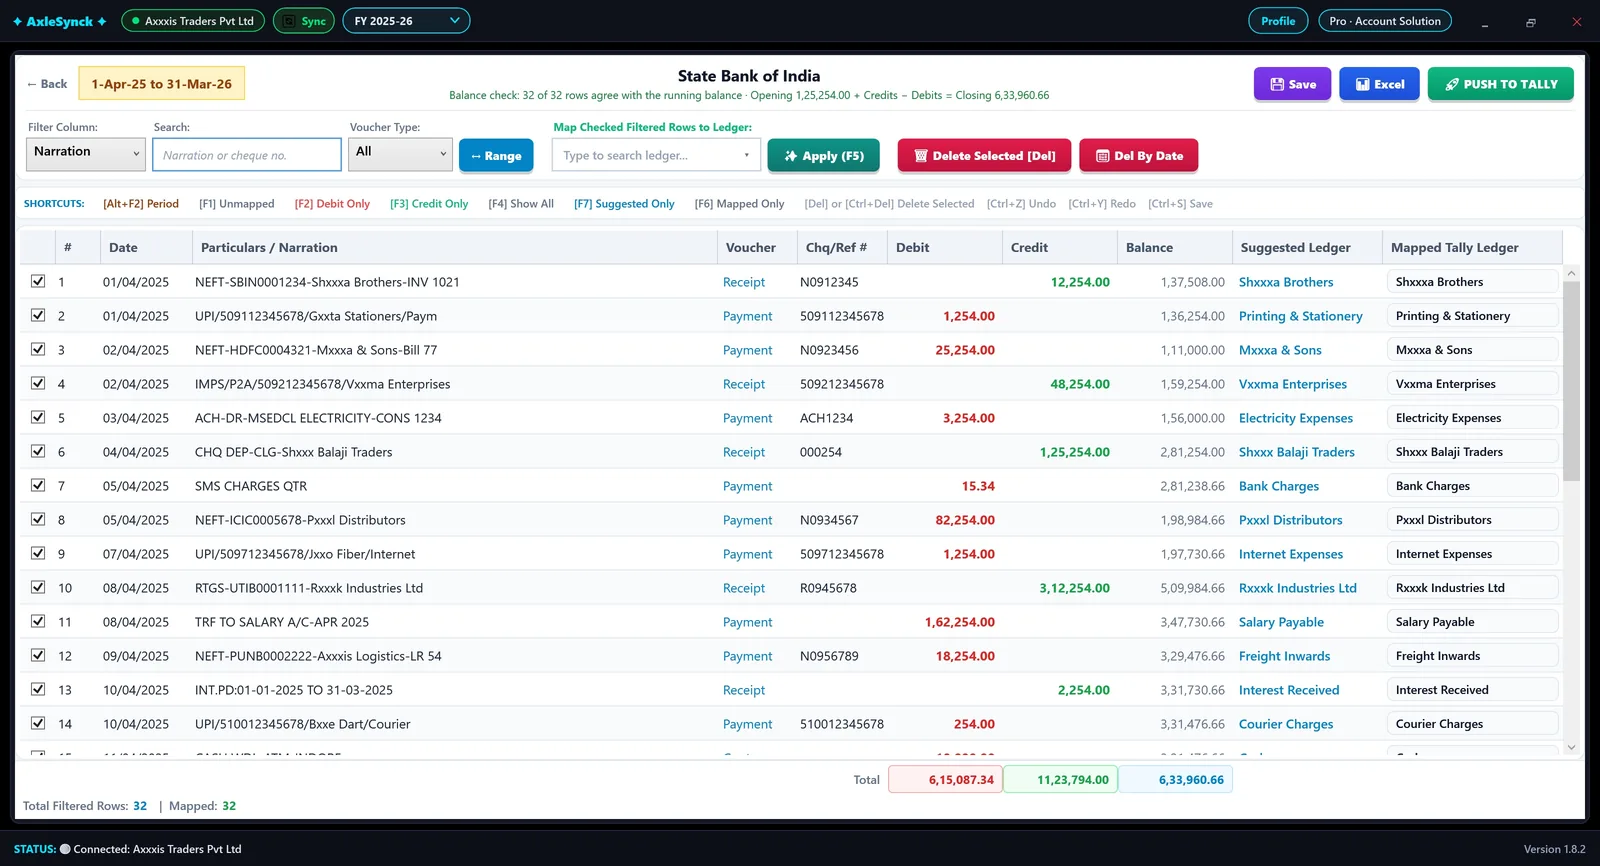
Every row is checked as previous balance − debit + credit against the balance printed on the statement, and AxleSynck suggests a ledger for each row from what you mapped before.

  1. Read the balance check

    The line under the bank name says how many rows agree with the running balance. A row the balance proves wrong is corrected; any other disagreement is marked on the row.

  2. Review the suggestions

    Suggested Ledger comes from your past mappings. Mapped Tally Ledger is what will be posted; change it on any row.

  3. Map many rows at once

    Filter with Search, Voucher Type or Range, tick the rows, type a ledger in Map Checked Filtered Rows to Ledger and press Apply (F5).

  4. Clean up

    Delete Selected [Del] removes ticked rows; Del By Date removes a date range. Ctrl+Z undoes and Ctrl+Y redoes.

  5. Save

    Save (Ctrl+S) keeps the statement to finish later; Excel (Alt+E) exports the rows.

AxleSynck: Bank Statement > the rows
Bank Statement > the rows
  1. 1Balance check: rows agreeing with the running balance
  2. 2Search in the filter column
  3. 3Voucher type: Payment, Receipt or Contra
  4. 4Amount range
  5. 5Ledger for the ticked, filtered rows
  6. 6Apply (F5)
  7. 7Suggested ledger
  8. 8Mapped Tally ledger
  9. 9Save (Ctrl+S)
  10. 10Excel (Alt+E)

Keyboard shortcuts

Alt+F2Period
F1Unmapped rows
F2Debit only
F3Credit only
F4Show all
F6Mapped only
F7Suggested only
F5Apply the ledger
DelDelete selected
Ctrl+Z / Ctrl+YUndo / Redo
Ctrl+SSave
Alt+EExcel
Bank statement#

Push the statement to Tally, and undo it

One click posts every mapped row to Tally as Payment, Receipt or Contra vouchers. If something is wrong, the whole batch can be taken back.

  1. Push

    Click PUSH TO TALLY. With Ask before pushing to Tally on (Settings > Tally connection) you confirm once more; a warning appears if rows were pushed before.

  2. Watch the progress

    The vouchers go to the company open in Tally, with a count as they are posted.

  3. Undo if needed

    Open Push History, pick Bank, and click Undo on the batch. That deletes those vouchers in Tally.

AxleSynck: Push the mapped rows
Push the mapped rows
  1. 1PUSH TO TALLY
  2. 2Total rows and how many are mapped
Part 3 · 7 guides

GST reconciliation

GST reconciliation#

Step 1: fetch GST data from Tally

Every GST report compares your books with the returns, so first AxleSynck reads the GST vouchers of the months you pick. It also reads the Sundry Creditors ledgers for the creditors-over-180-days report.

You needGST Reconciliation (Pro)Tally open with the company
  1. Open GST Reconciliation

    From the dashboard click GST Reconciliation.

  2. Fetch from Tally (F5)

    Click Fetch from Tally (F5).

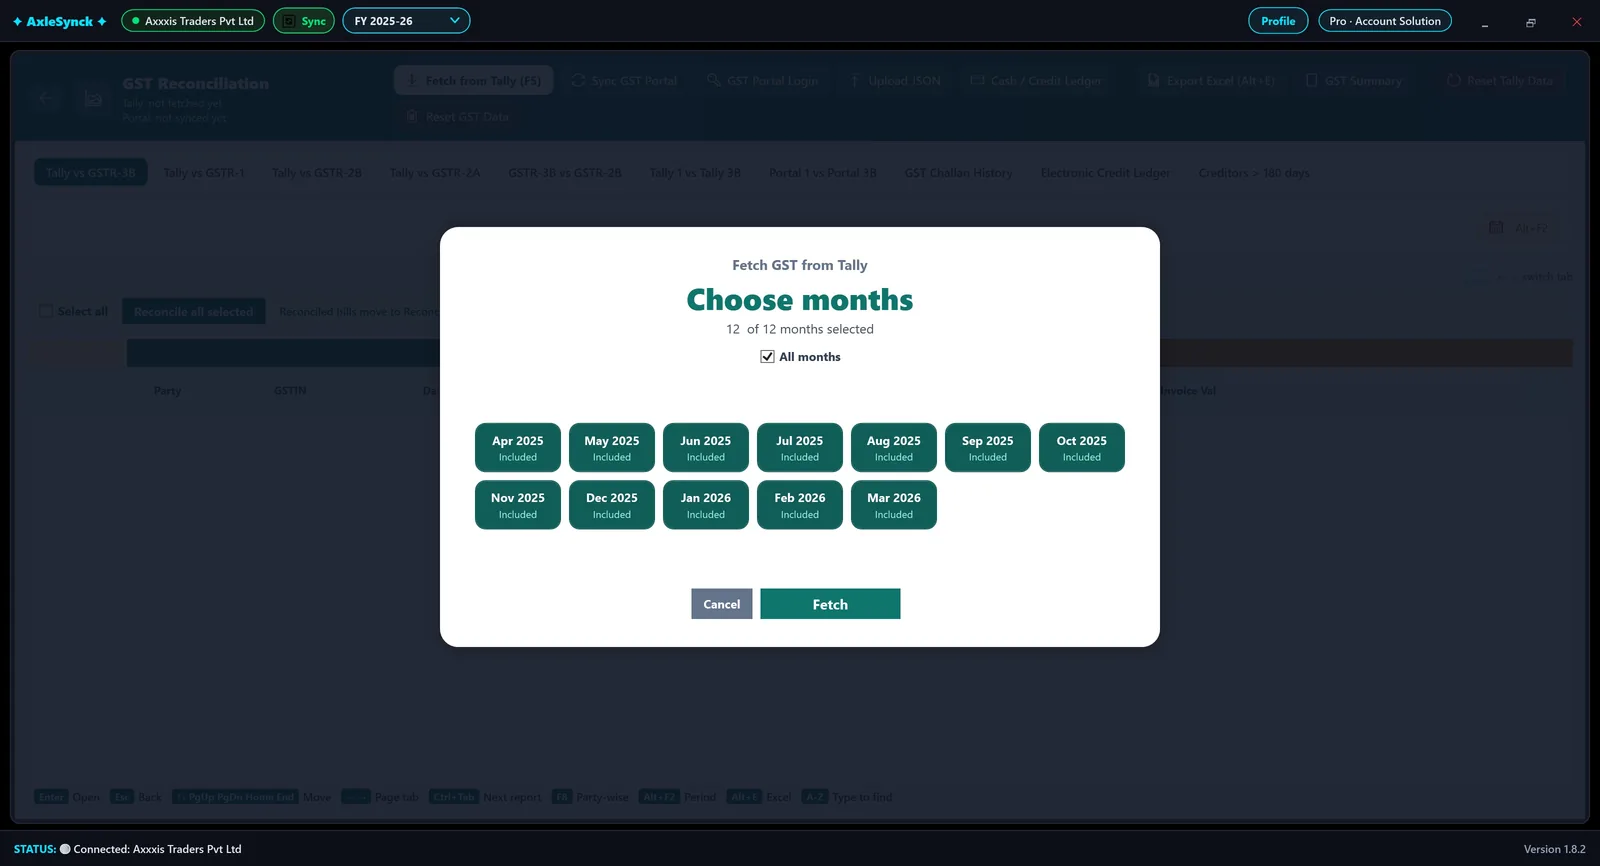
  3. Choose months

    All 12 months are picked. Untick All months to start from nothing, then click the months you want, and click Fetch.

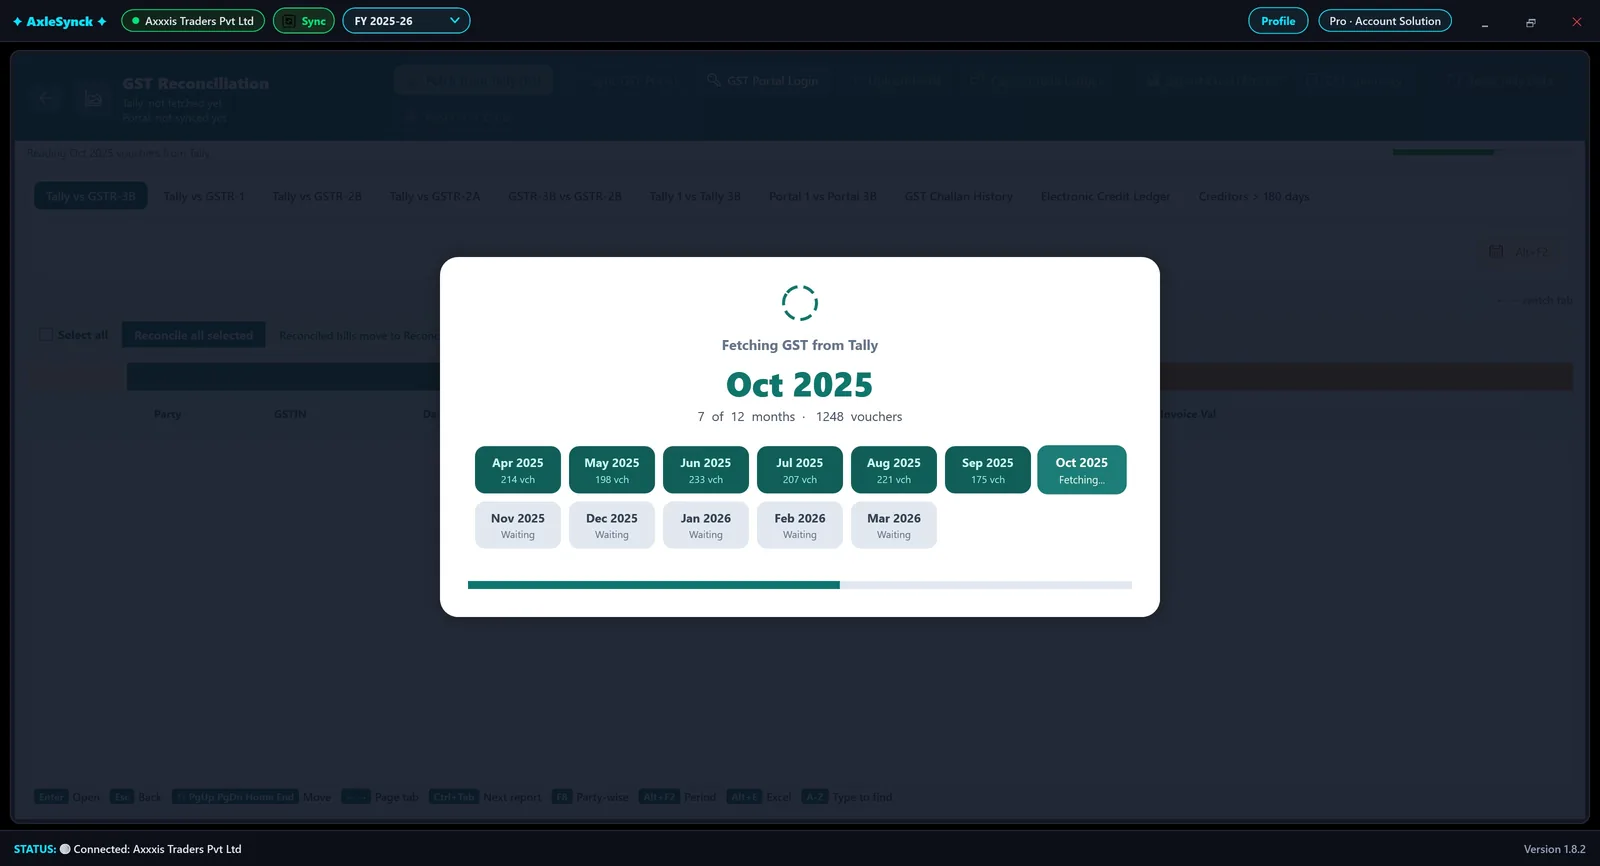
  4. Wait for the months

    Each month turns green with its voucher count. The header then shows Tally last fetched.

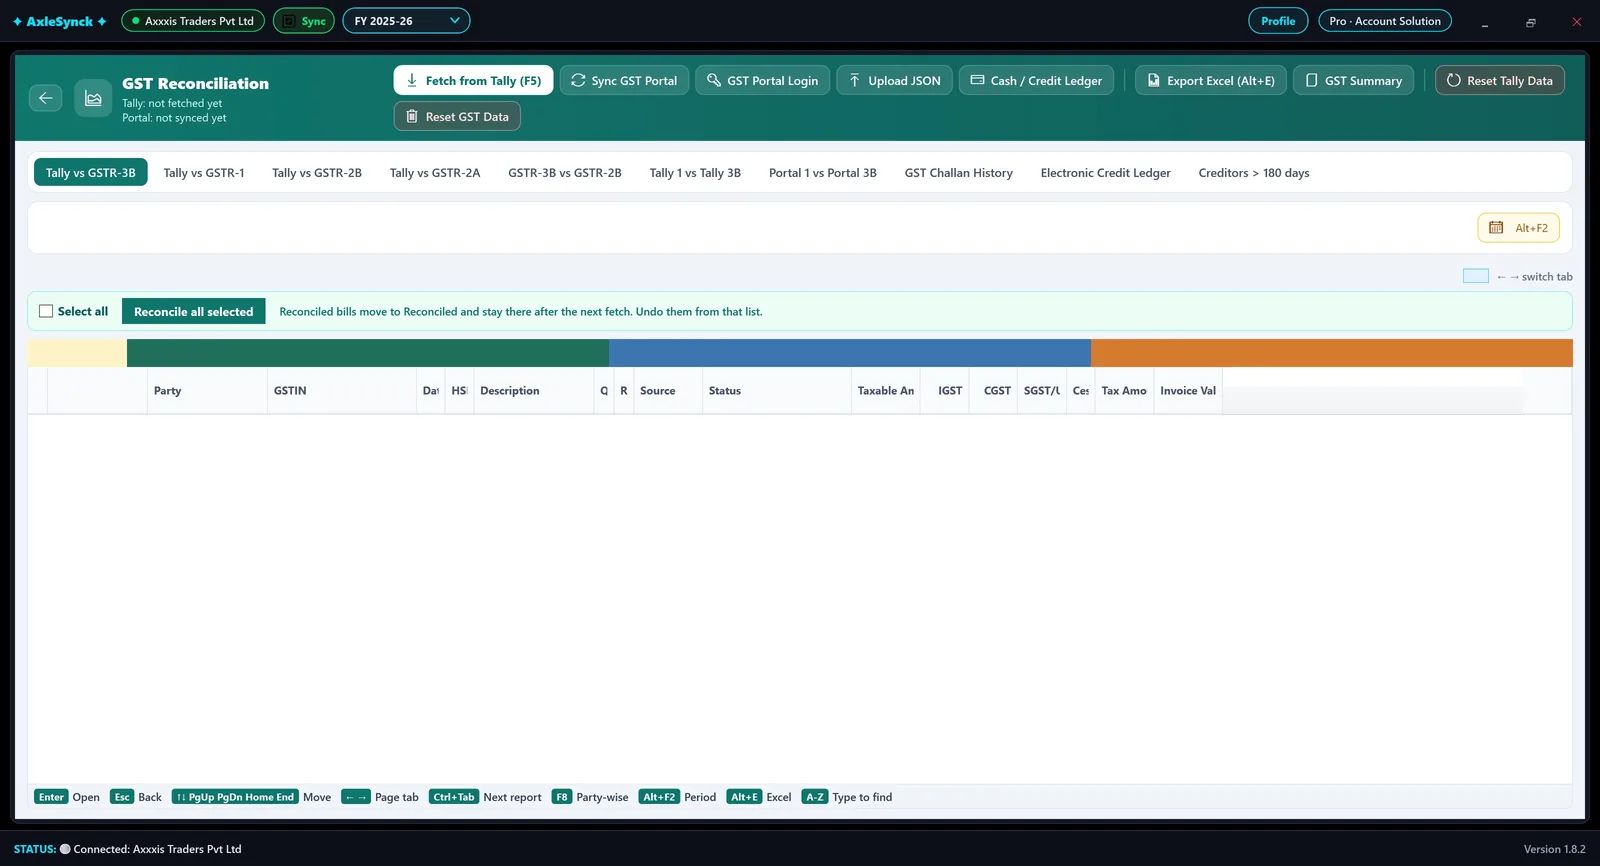
AxleSynck: GST Reconciliation before the first fetch
GST Reconciliation before the first fetch
  1. 1Fetch from Tally (F5)
  2. 2Sync GST Portal (step 2)
  3. 3When Tally and the portal were last read
AxleSynck: Choose months
Choose months
  1. 1All months
  2. 2Click a month to include or leave it out
  3. 3Fetch
AxleSynck: Fetching, month by month
Fetching, month by month
  1. 1The month being read
  2. 2Progress

Reset Tally Data deletes the Tally vouchers saved for this company and year and opens Fetch again. Portal data and your manual reconciliations are kept.

GST reconciliation#

Step 2: sync GST returns from the portal

AxleSynck signs in to the GST portal and downloads GSTR-1, GSTR-3B, GSTR-2B and GSTR-2A for the months you pick, in one go.

You needYour GST portal username and password (saved per company in Settings > Portal logins)
  1. Sync GST Portal

    Click Sync GST Portal. Your saved username and password are filled in; tick Remember for this company to save them.

  2. Sign in

    Type the captcha shown and click Login, then open the Return Dashboard as the screen asks.

  3. Pick months and returns

    Tick the months (or Select all months) under GSTR-1, GSTR-3B, GSTR-2B and GSTR-2A, then Download selected.

  4. Let it finish

    The portal prepares GSTR-1 and GSTR-2A files first; Don't wait for GSTR-1 / GSTR-2A files lets the rest finish without them.

AxleSynck: Other ways to bring the returns in
Other ways to bring the returns in
  1. 1Sync GST Portal
  2. 2GST Portal Login: opens the portal in Chrome or Edge with your login filled in
  3. 3Upload JSON: GSTR-1, 3B or 2B files downloaded from the portal (or drop them on the screen)
  4. 4Cash / Credit Ledger: the electronic cash and credit ledgers for the year
  5. 5Reset GST Data: deletes the saved returns and opens Sync again
GST reconciliation#

Tally vs GSTR-3B

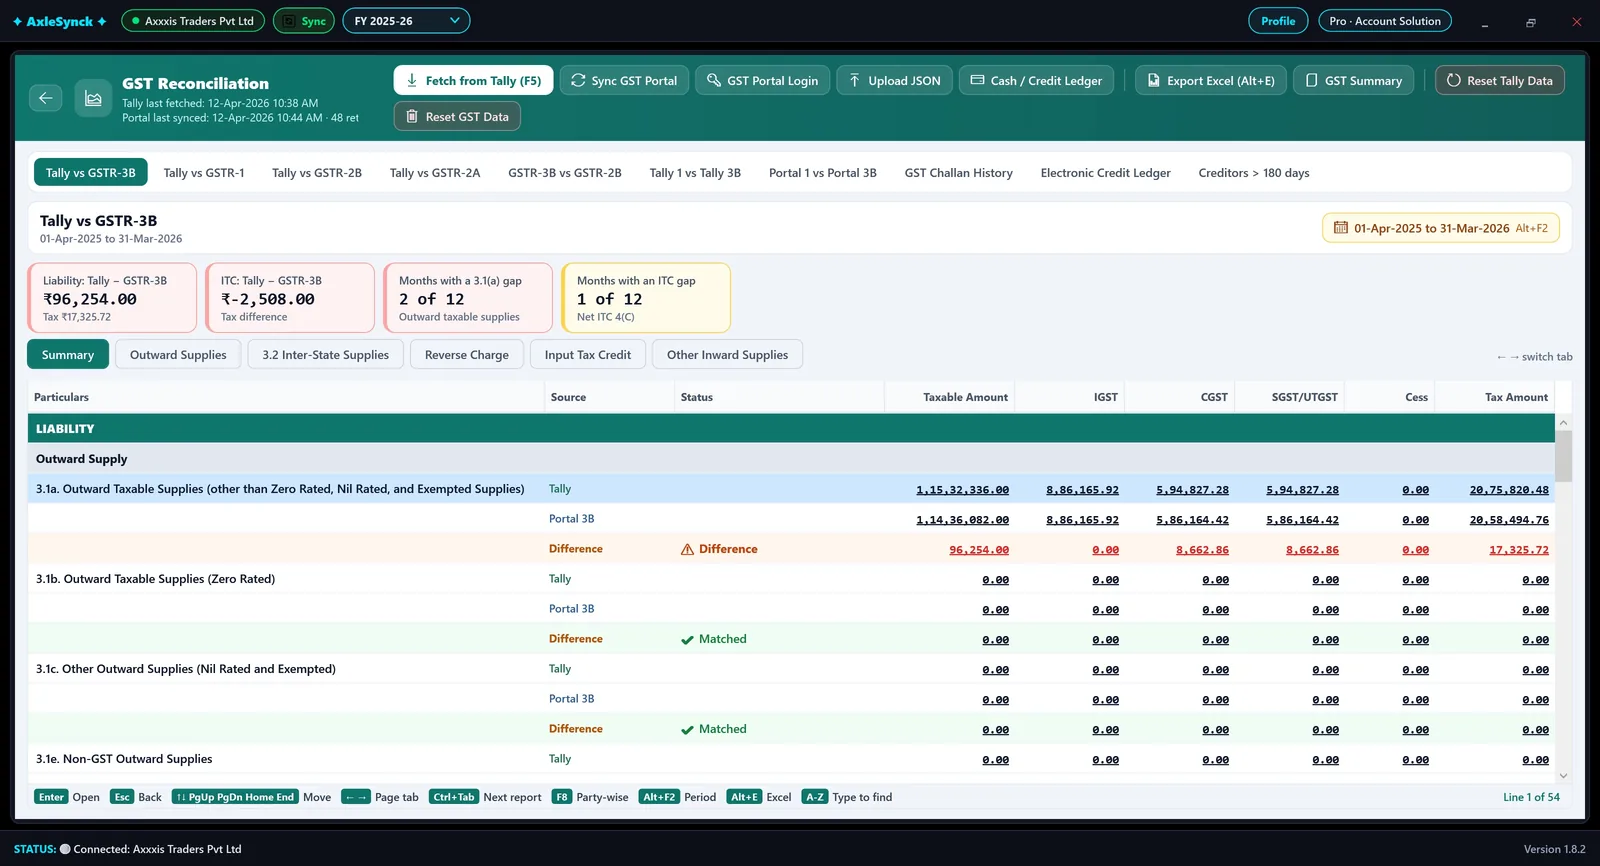
Your books against the GSTR-3B you filed, head by head: outward supplies (3.1), reverse charge, inter-state supplies (3.2) and input tax credit (4).

  1. Open the tab

    Click Tally vs GSTR-3B.

  2. Read the cards

    Liability and ITC difference (Tally − GSTR-3B), and how many months have a gap.

  3. Find the head

    Each head shows three lines: Tally, Portal 3B and the Difference. The page tabs (Outward Supplies, Input Tax Credit…) show one part at a time.

  4. Drill down

    Press Enter on a difference to see it month by month, and Enter again on a month to see its bills. Esc goes back.

AxleSynck: Tally vs GSTR-3B
Tally vs GSTR-3B
  1. 1Tally vs GSTR-3B
  2. 2Liability difference
  3. 3ITC difference
  4. 4The difference for this head; Enter to open
  5. 5Page tabs
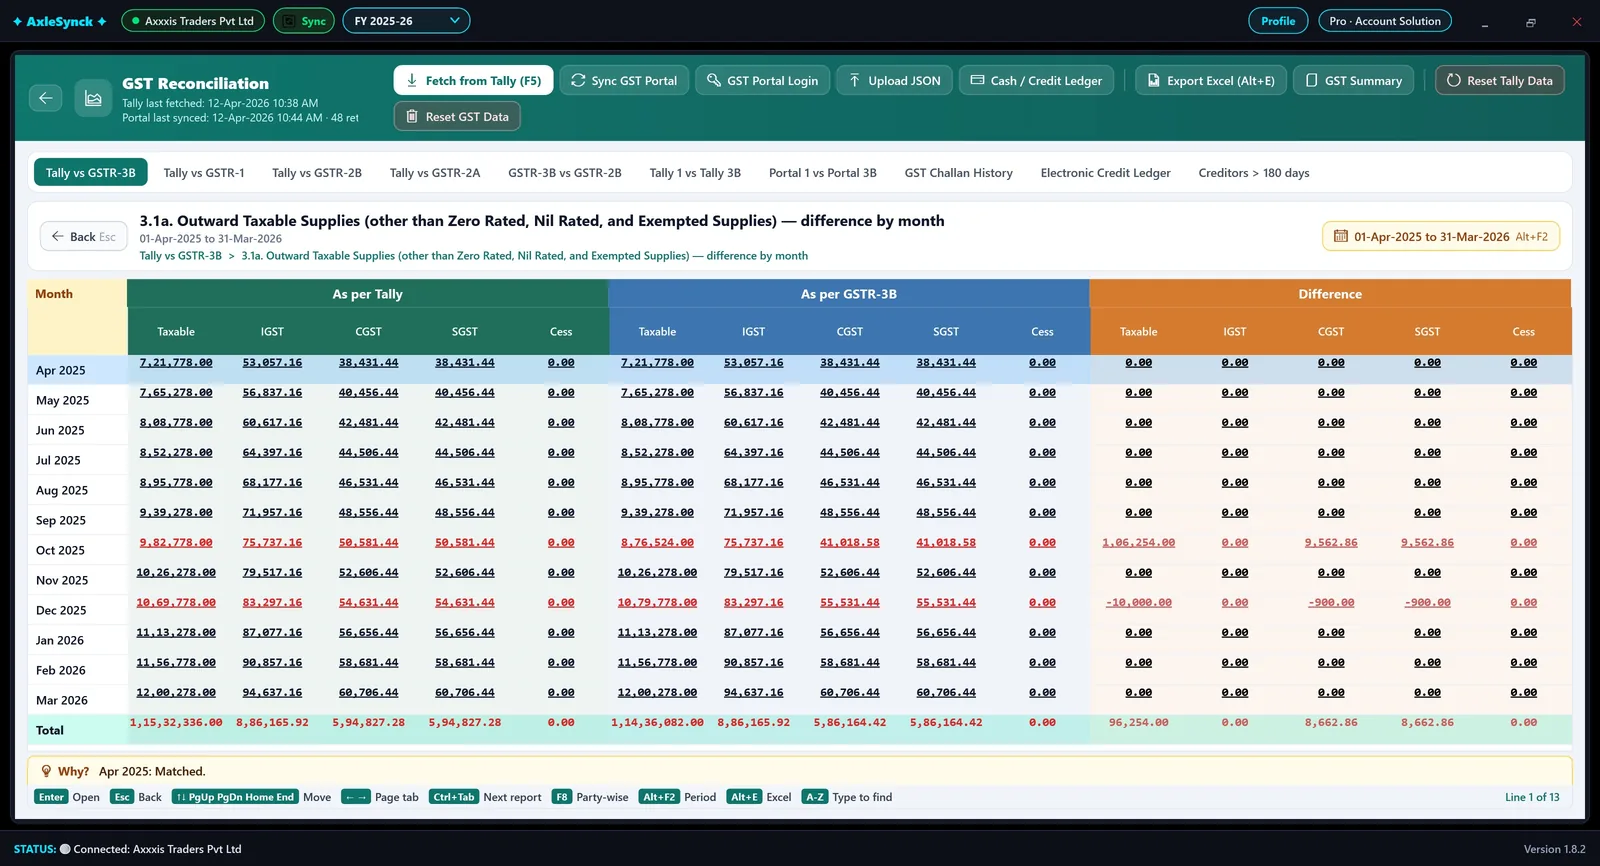
AxleSynck: The difference, month by month
The difference, month by month
  1. 1October is short in 3B
  2. 2December was over-reported
  3. 3Back (Esc)
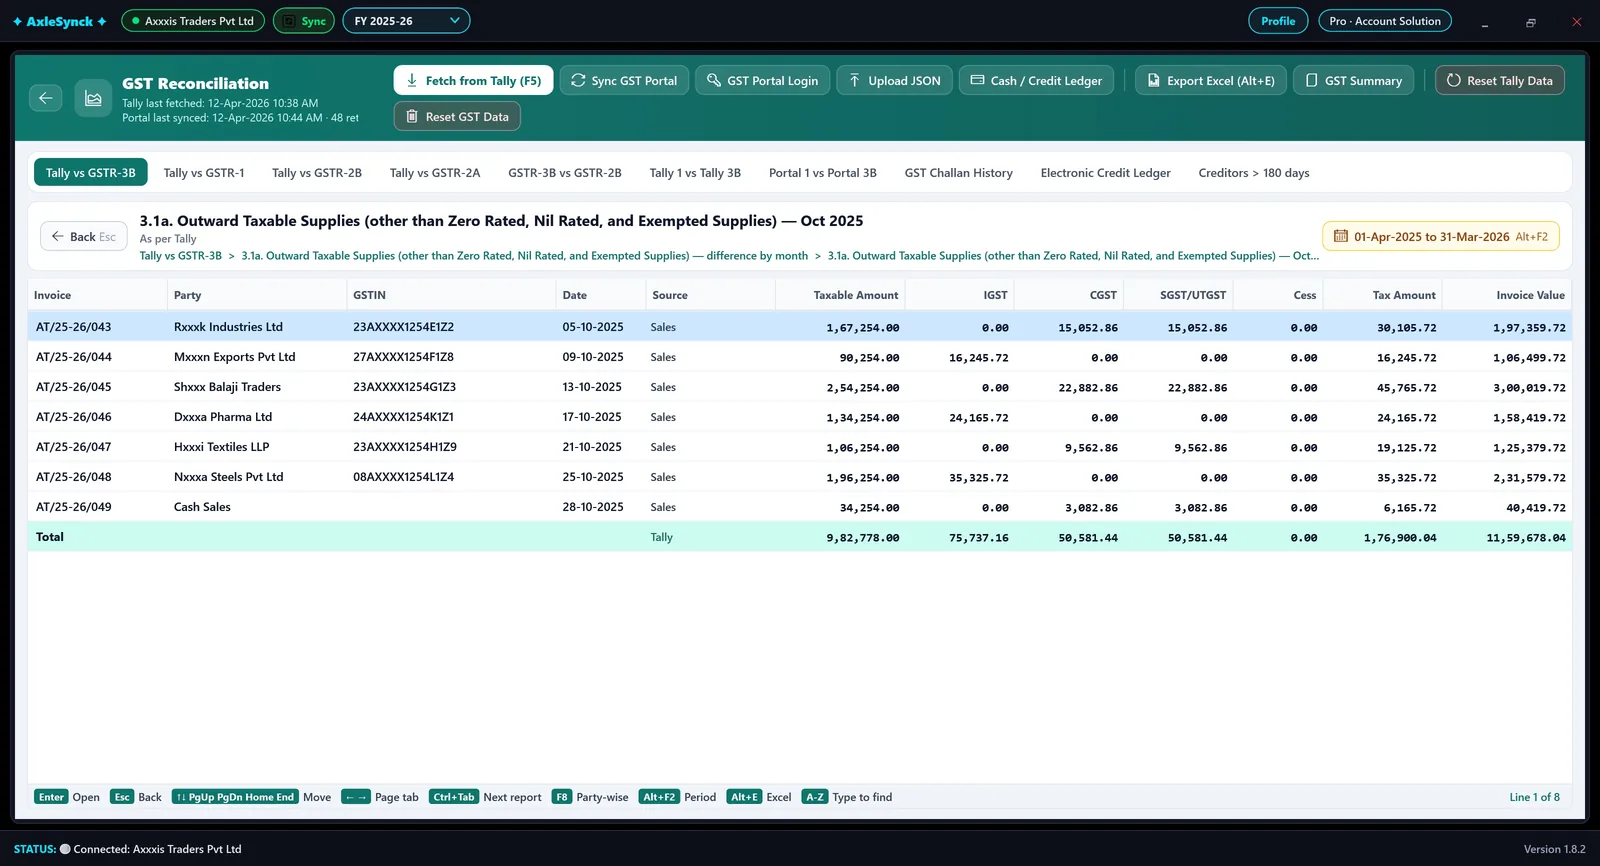
AxleSynck: The month's bills as per Tally
The month's bills as per Tally
  1. 1This bill accounts for the October difference

The Why? bar at the foot of every report explains the line the cursor is on in plain words.

GST reconciliation#

Tally vs GSTR-1

Every sales bill in your books against GSTR-1, section by section, so a bill missing from the return or keyed with the wrong amount is found before your customer's ITC is stuck.

  1. Open the tab

    Click Tally vs GSTR-1.

  2. Read the cards

    Net difference, bills in Tally but not in GSTR-1, bills in GSTR-1 but not in Tally, same bill with a different value, and amendments.

  3. Pick a section

    B2B, B2C Large, B2C Small, CDNR, CDNUR, Exports, Advances, Nil / Exempt, HSN and Documents each have a tab.

  4. Open the differences

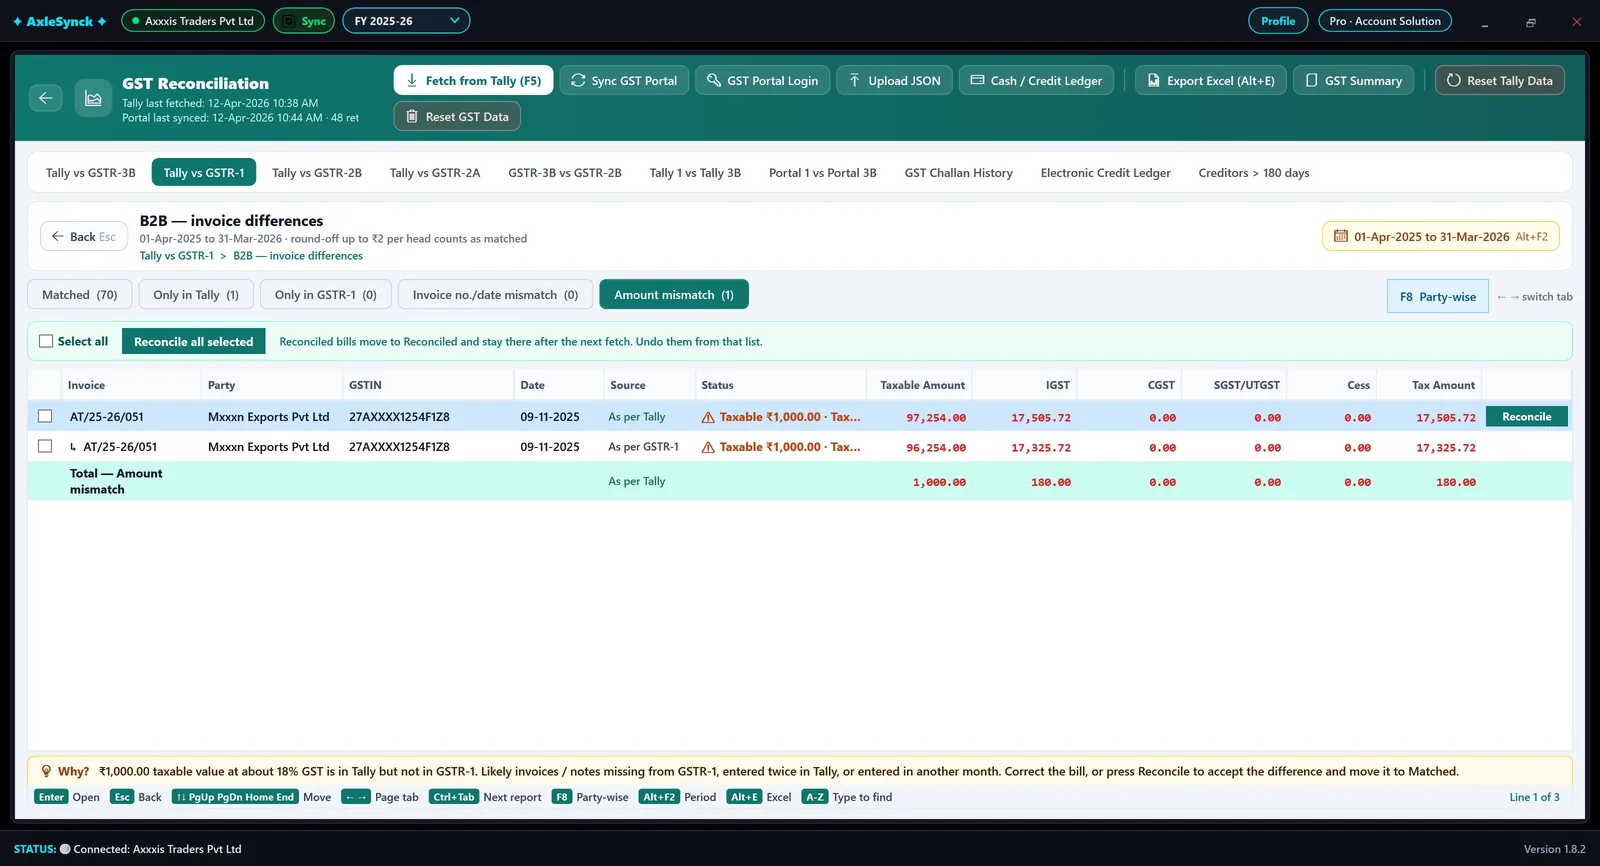
    Enter on a difference opens the bills, split into Matched, Only in Tally, Only in GSTR-1, Invoice no./date mismatch and Amount mismatch.

  5. Accept a difference

    Reconcile on a bill accepts it and moves it to Matched; it stays there after the next fetch.

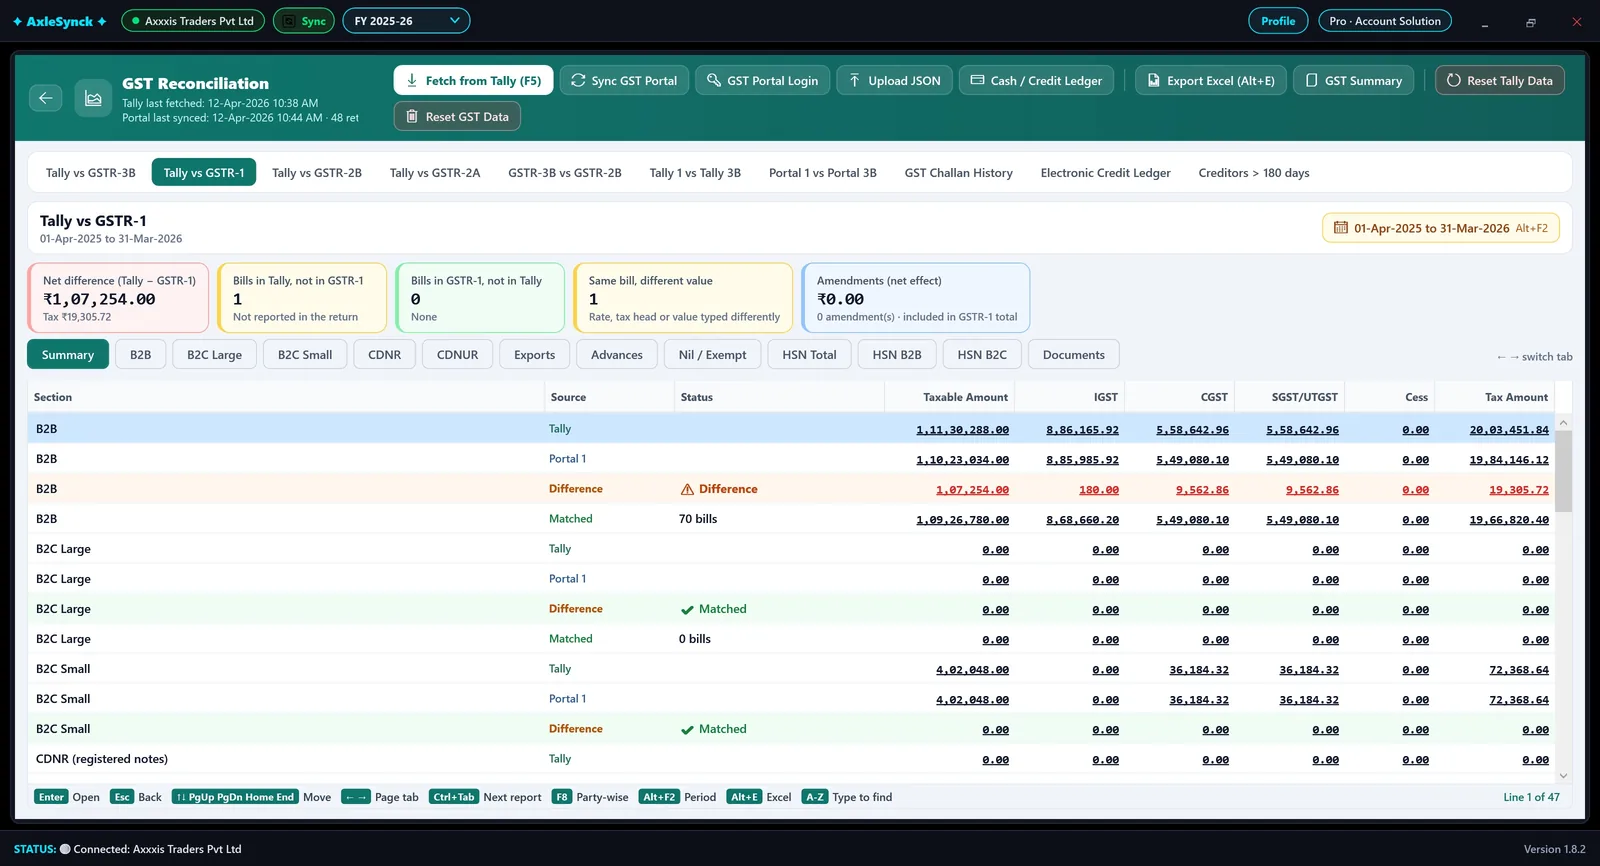
AxleSynck: Tally vs GSTR-1
Tally vs GSTR-1
  1. 1Tally vs GSTR-1
  2. 2Bills in Tally, not in GSTR-1
  3. 3Same bill, different value
  4. 4Section tabs
  5. 5B2B difference; Enter to open
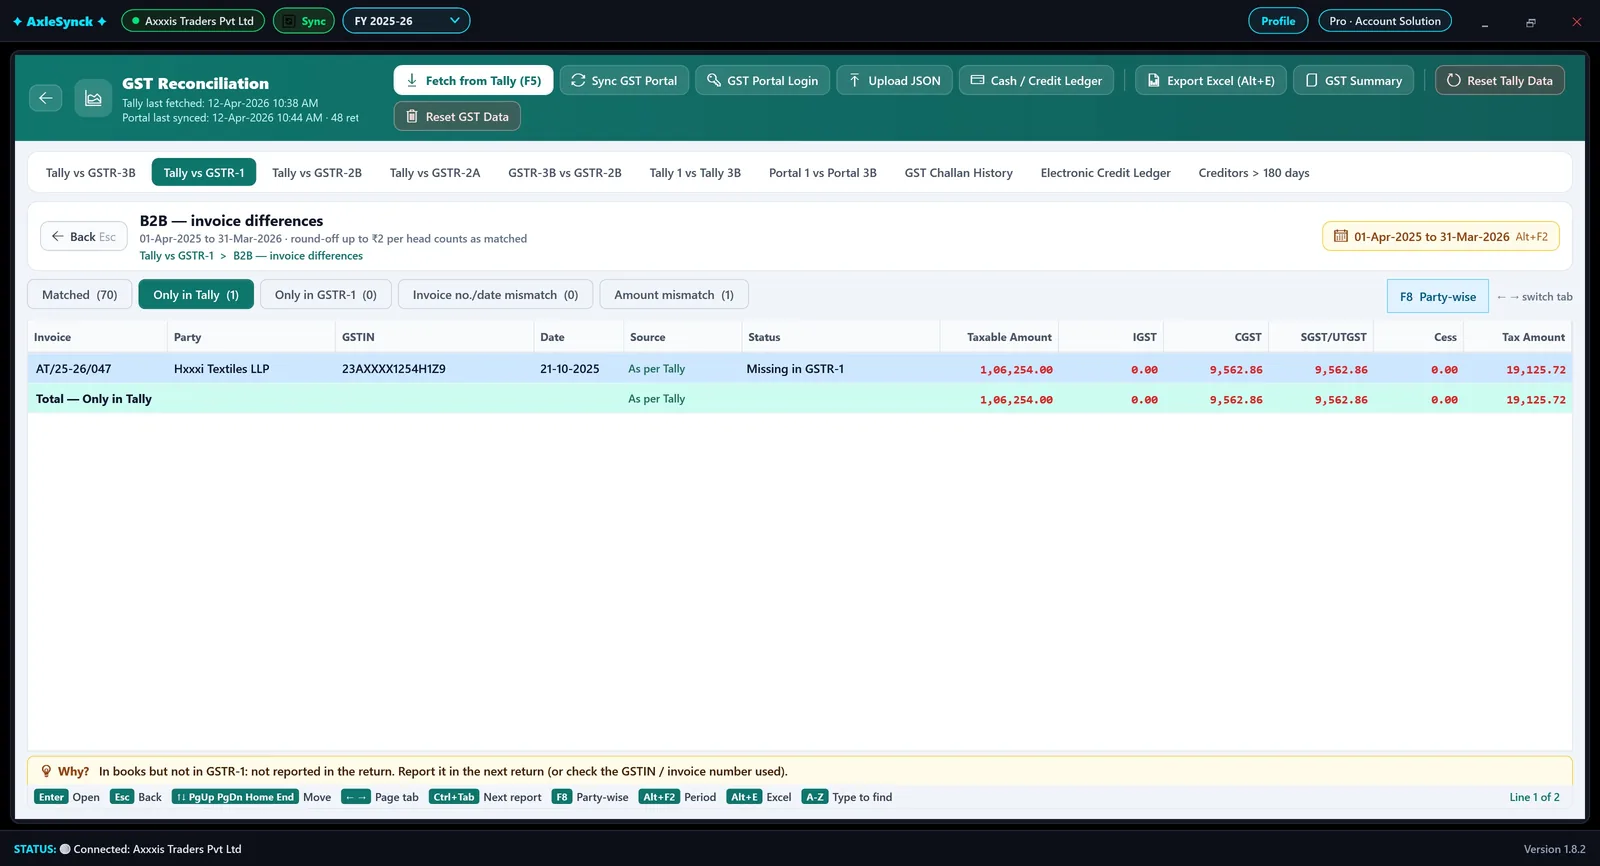
AxleSynck: A bill missing in GSTR-1
A bill missing in GSTR-1
  1. 1Only in Tally
  2. 2The missing bill
AxleSynck: The same bill with a different amount
The same bill with a different amount
  1. 1Amount mismatch
  2. 2Reconcile: accept it as matched
  3. 3Why? explains the difference

F8 switches between bill-wise and party-wise.

GST reconciliation#

Tally vs GSTR-2B (ITC)

Your purchase bills against GSTR-2B, the fixed monthly ITC statement: ITC at risk (in books, not in 2B), ITC not yet booked (in 2B, not in books) and value mismatches, bill by bill.

  1. Open the tab

    Click Tally vs GSTR-2B.

  2. How bills are matched

    Match purchases on: Auto uses Tally's Supplier Invoice No. and date, and the voucher number where that is blank or a placeholder.

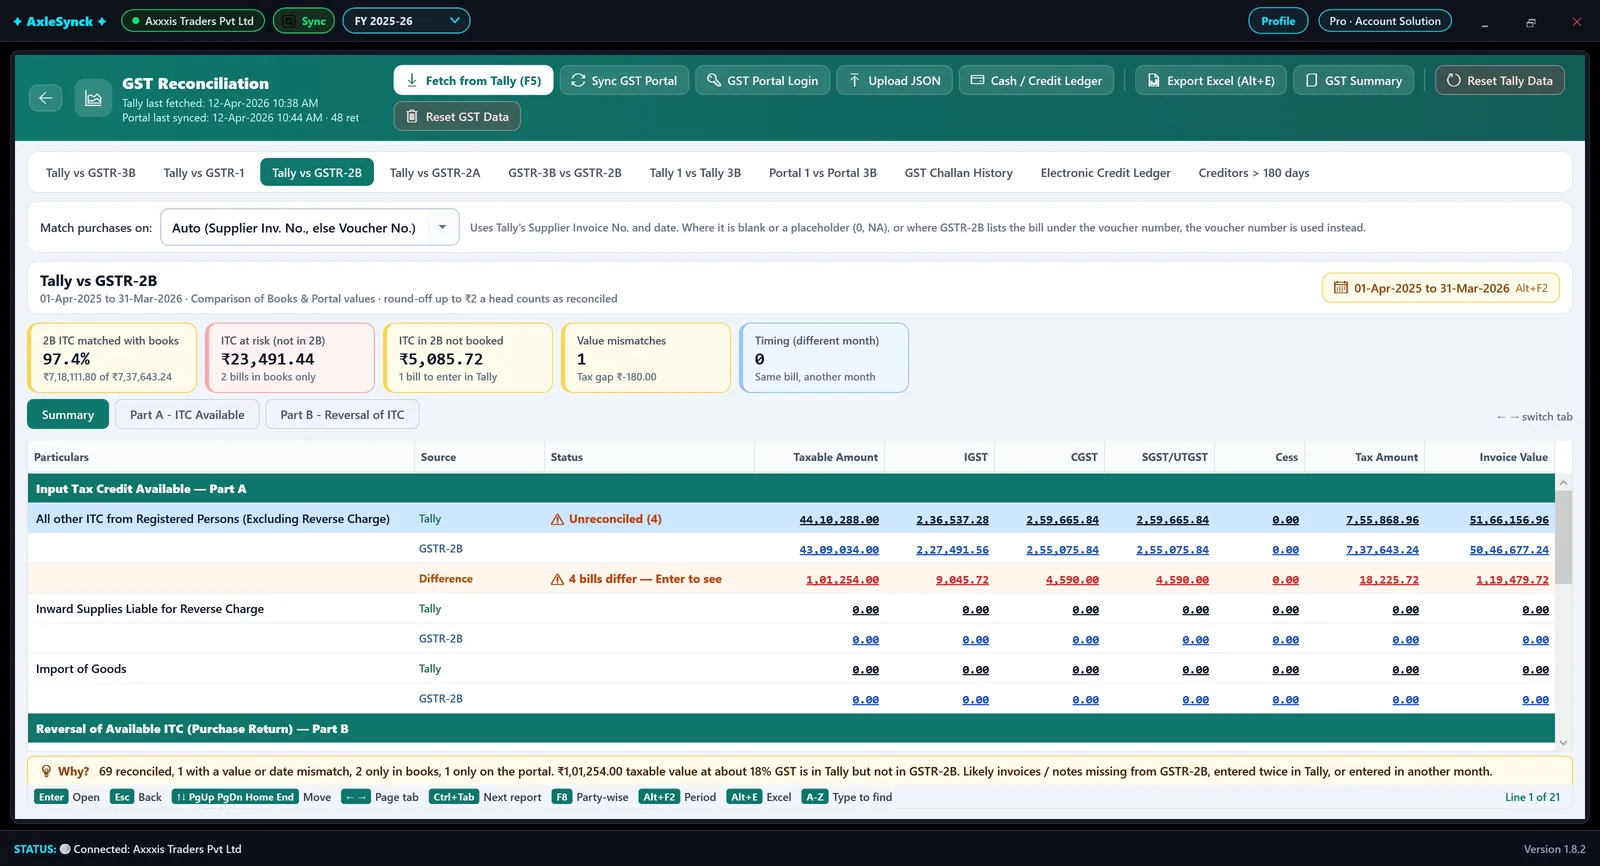
  3. Read the cards

    2B ITC matched with books (%), ITC at risk, ITC in 2B not booked, value mismatches and timing (same bill, another month).

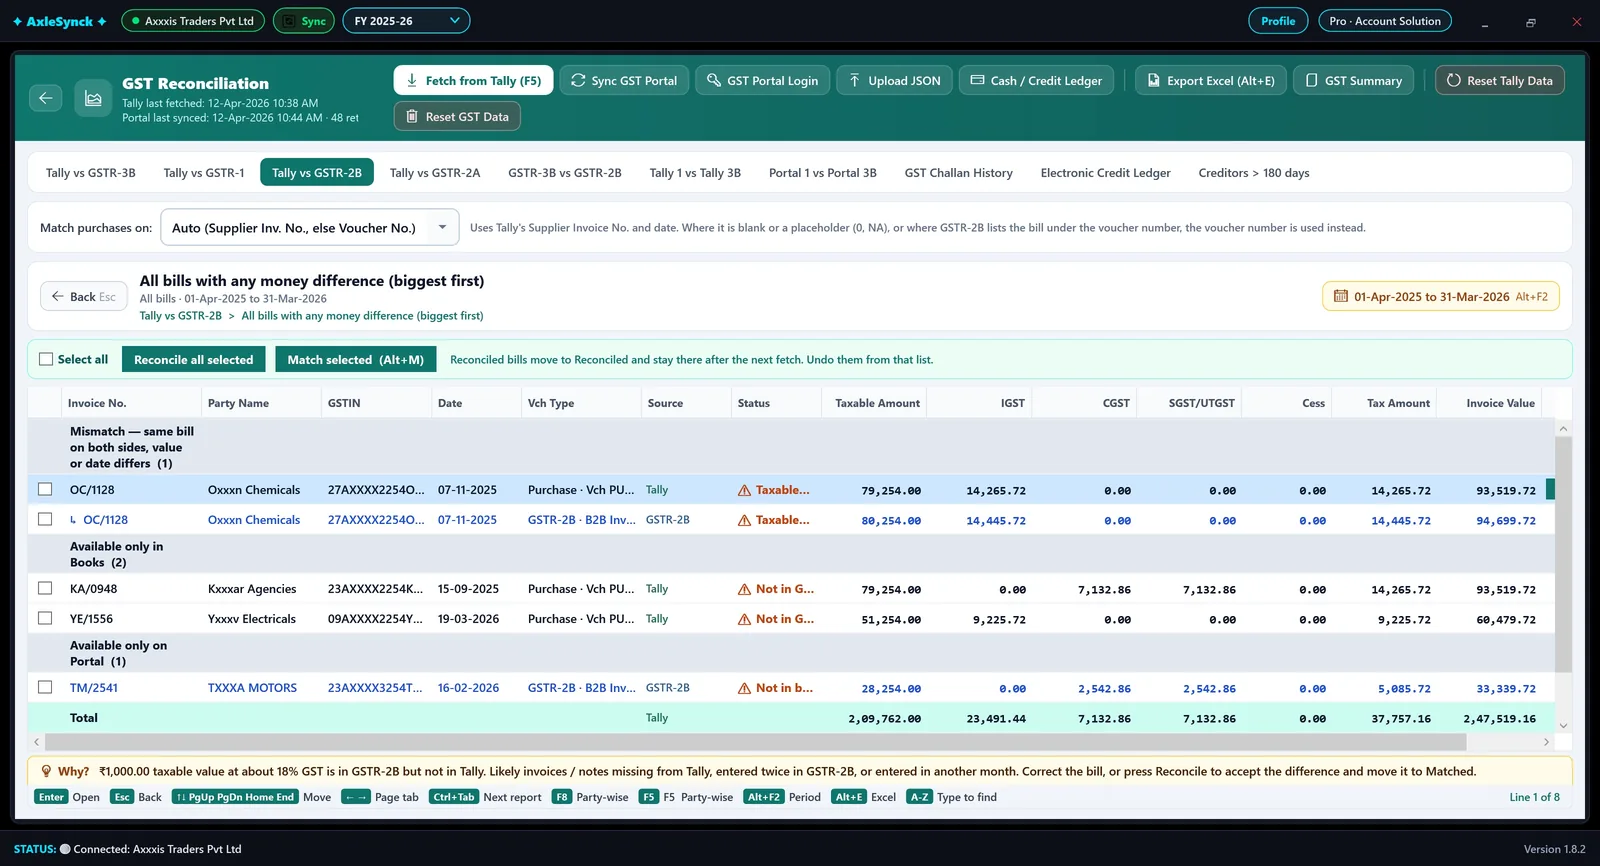
  4. Open the bills

    Enter on a line, or on All bills with any money difference, lists the bills under Mismatch, Available only in Books and Available only on Portal.

  5. Settle them

    Tick bills and Reconcile all selected to accept them. To pair two bills, tick one under only in Books and one under only on Portal and press Match selected (Alt+M).

AxleSynck: Tally vs GSTR-2B
Tally vs GSTR-2B
  1. 1Tally vs GSTR-2B
  2. 2Match purchases on
  3. 3ITC at risk (not in 2B)
  4. 4ITC in 2B not booked
  5. 5Difference; Enter to see the bills
AxleSynck: Every bill with a money difference
Every bill with a money difference
  1. 1Tick a bill
  2. 2Reconcile all selected
  3. 3Match selected (Alt+M)
  4. 4Available only in books: ITC at risk
  5. 5Available only on portal: not entered in Tally

Reconciled bills move to Reconciled and stay there after the next fetch. Undo them from that list.

GST reconciliation#

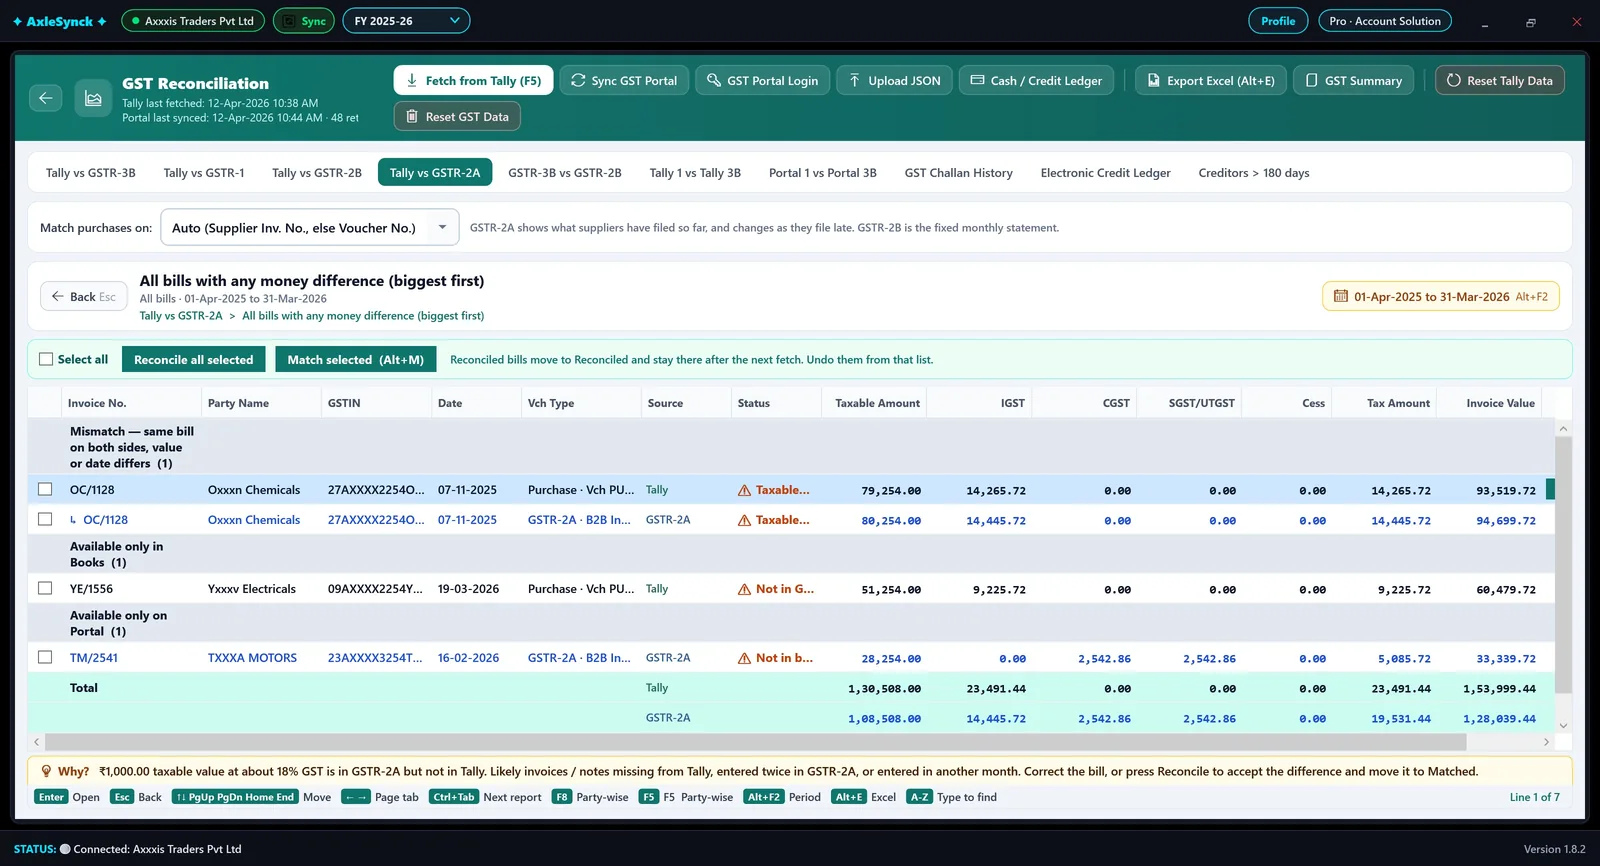
Tally vs GSTR-2A

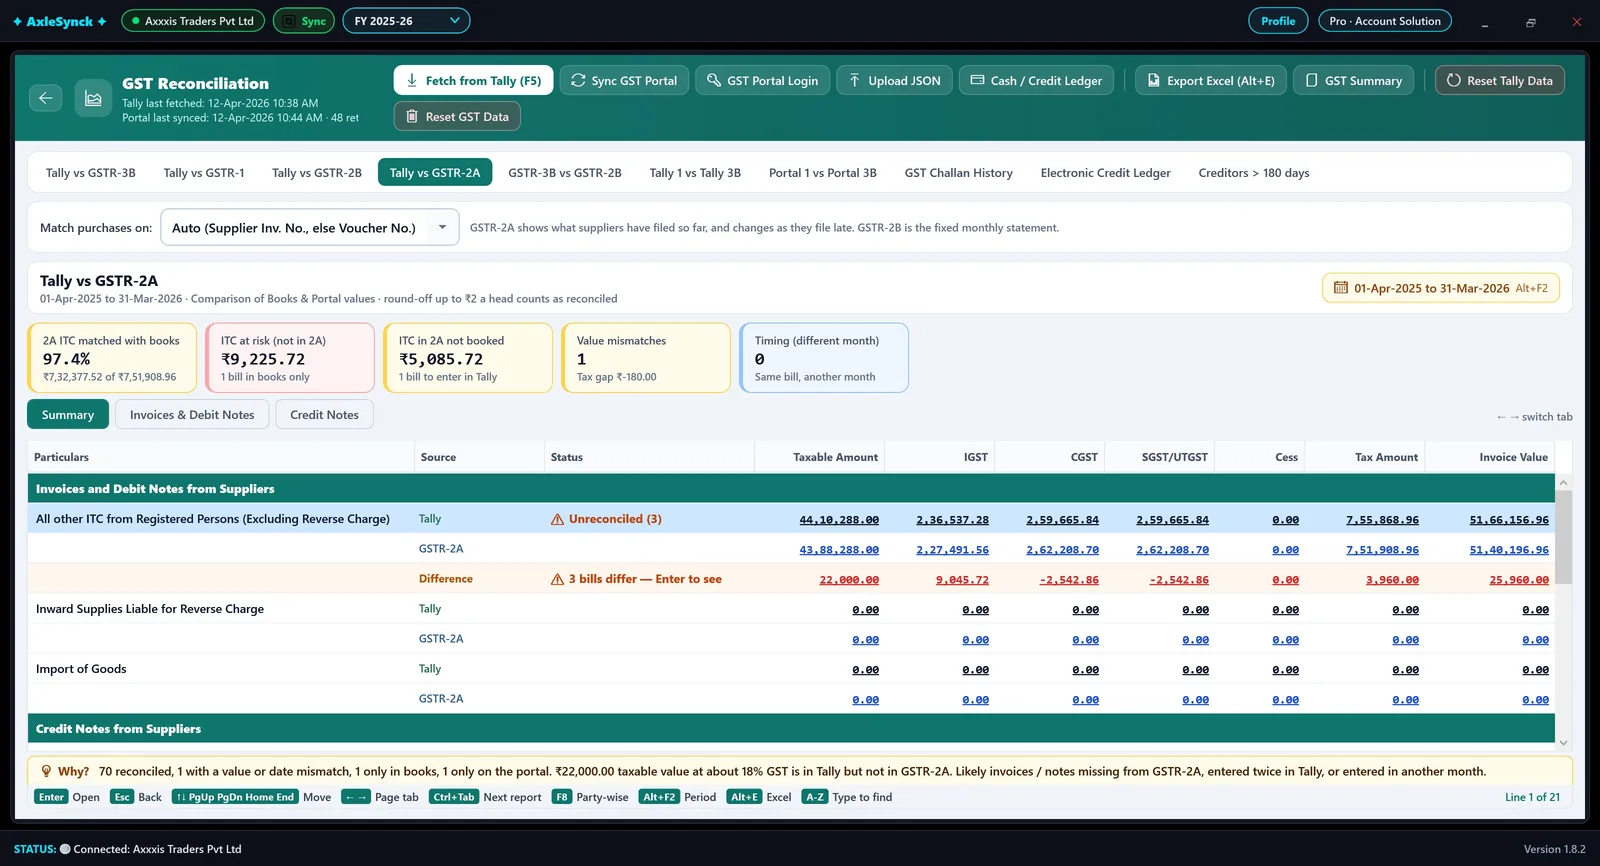
GSTR-2A shows what suppliers have filed so far and changes as they file late; GSTR-2B is the fixed monthly statement. Use 2A to find bills that were filed late and follow up on the rest.

  1. Open the tab

    Click Tally vs GSTR-2A. It works like Tally vs GSTR-2B.

  2. Compare with 2B

    A bill missing in 2B but present in 2A was filed late by the supplier.

  3. Follow up

    What is still missing goes to Excel (Alt+E) to send to the supplier.

AxleSynck: Tally vs GSTR-2A
Tally vs GSTR-2A
  1. 1Tally vs GSTR-2A
  2. 2What 2A is, compared with 2B
  3. 32A ITC matched with books
AxleSynck: Bills still missing in 2A
Bills still missing in 2A
  1. 1Still not filed: follow up with the supplier
GST reconciliation#

More GST reports and shortcuts

Beyond the four main comparisons, the report tabs cover the checks a CA runs before filing.

  1. GSTR-3B vs GSTR-2B

    ITC claimed in 3B against ITC available in 2B.

  2. Tally 1 vs Tally 3B, Portal 1 vs Portal 3B

    GSTR-1 against GSTR-3B 3.1(a), month by month, from your books and from the portal.

  3. Challans, ledgers and creditors

    GST Challan History, the Electronic Credit Ledger, and Creditors > 180 days (bills not paid in 180 days).

  4. Export

    Export Excel (Alt+E) saves the report on screen; GST Summary saves the whole workbook.

AxleSynck: The report tabs
The report tabs
  1. 1GSTR-3B vs GSTR-2B
  2. 2Tally 1 vs Tally 3B
  3. 3Portal 1 vs Portal 3B
  4. 4GST Challan History
  5. 5Electronic Credit Ledger
  6. 6Creditors > 180 days
  7. 7Export Excel (Alt+E)
  8. 8GST Summary

Keyboard shortcuts

EnterOpen the line
EscBack one level
↑ ↓ PgUp PgDn Home EndMove
← →Page tab
Ctrl+TabNext report
F8Party-wise
Alt+F2Period
Alt+EExcel
Alt+MMatch selected
A–ZType to find (F3 next)
Part 4 · 2 guides

TDS reconciliation

TDS reconciliation#

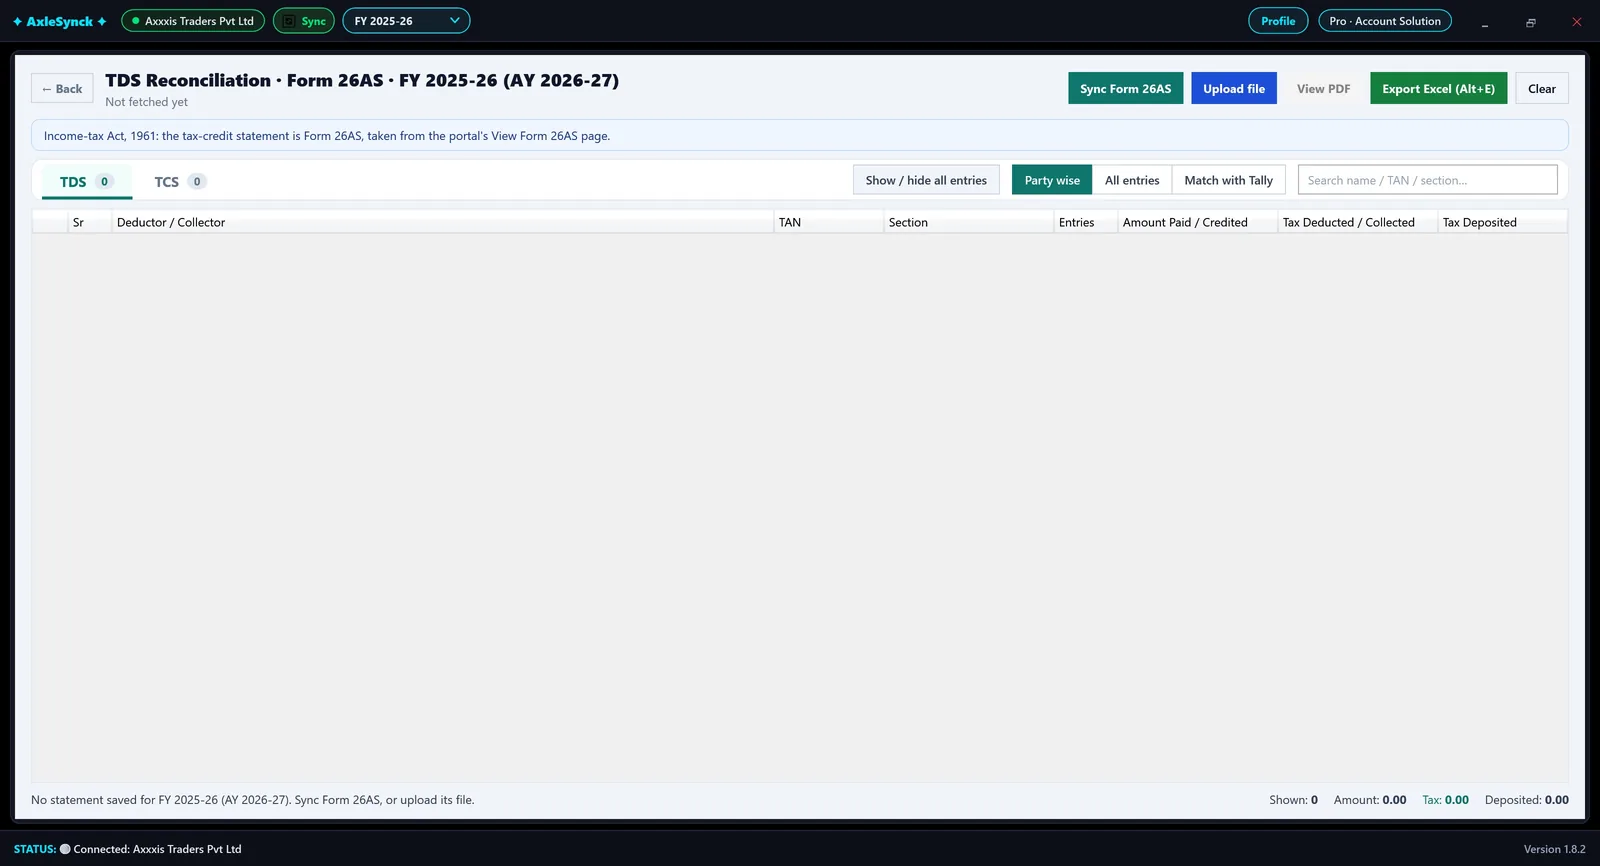
Sync Form 26AS / Form 168

AxleSynck signs in to the Income-tax portal out of sight and reads your tax-credit statement: Form 26AS under the Income-tax Act, 1961, or Form 168 under the new Act.

You needTDS Reconciliation (Pro)Income-tax portal user ID (PAN) and password, saved in Settings > Portal logins
  1. Open TDS Reconciliation

    From the dashboard click TDS Reconciliation. The party is the company open in Tally; you can also pick a saved party or type a new name.

  2. Sync

    Click Sync Form 26AS. Enter the OTP if the portal asks; the statement is read when the portal shows it.

  3. Or upload

    Upload file reads a statement you downloaded: PDF, saved web page (HTML), text or JSON. View PDF opens the statement's own PDF.

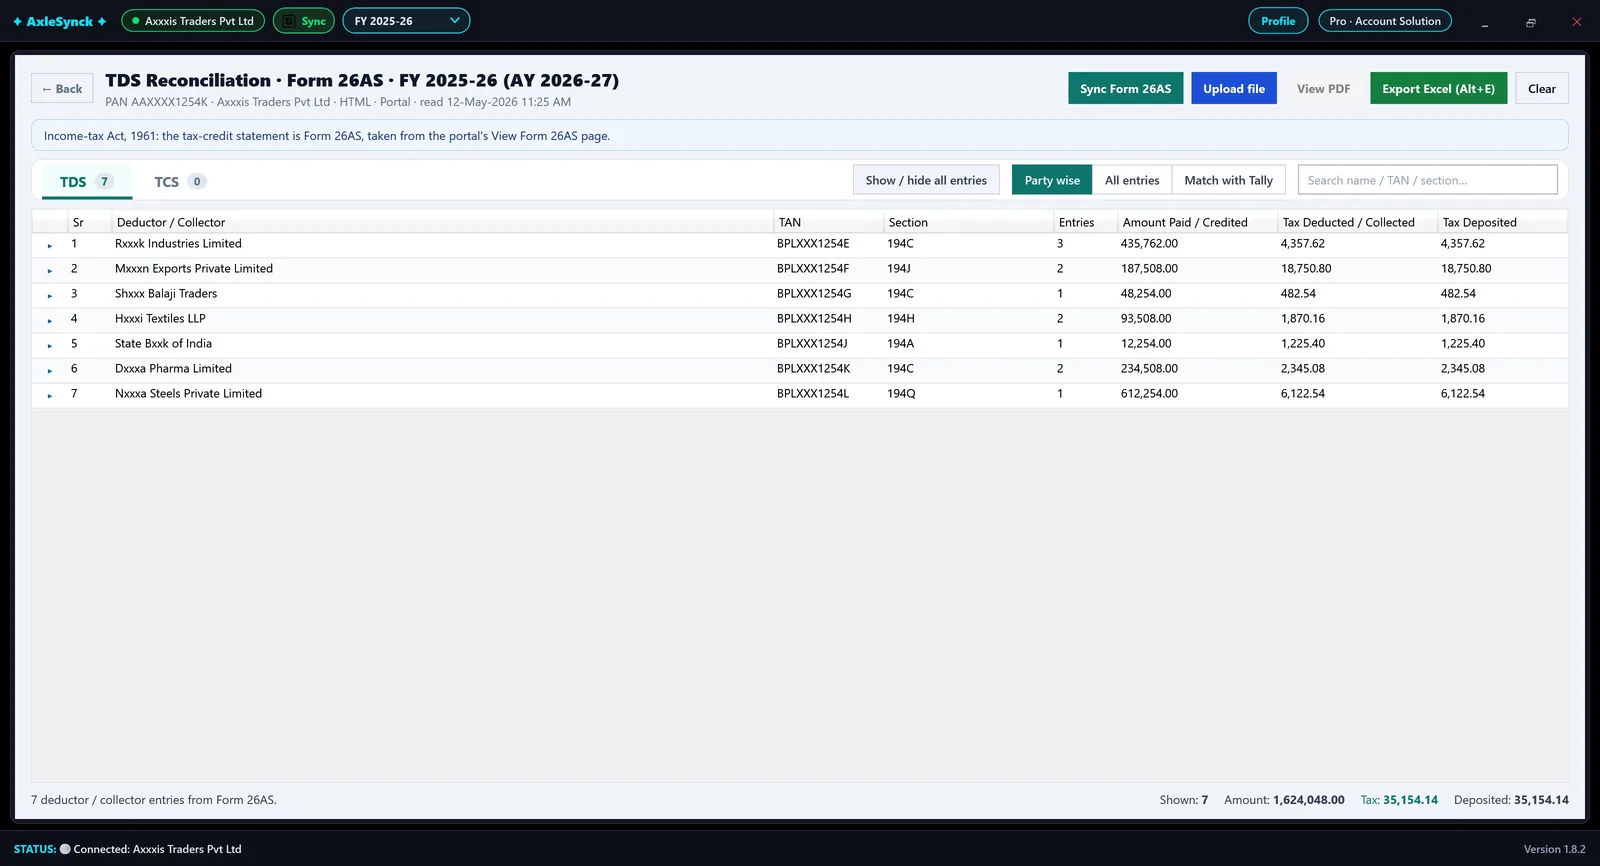
  4. Read it

    Party wise lists each deductor with its total; All entries lists every entry by date. The TDS and TCS tabs split the two.

AxleSynck: Before the first sync
Before the first sync
  1. 1Sync Form 26AS
  2. 2Upload file
  3. 3View PDF
  4. 4Export Excel (Alt+E)
  5. 5Party wise · All entries · Match with Tally
AxleSynck: The statement, party wise
The statement, party wise
  1. 1TDS / TCS
  2. 2A deductor: double-click to see its entries
  3. 3Search name / TAN / section
TDS reconciliation#

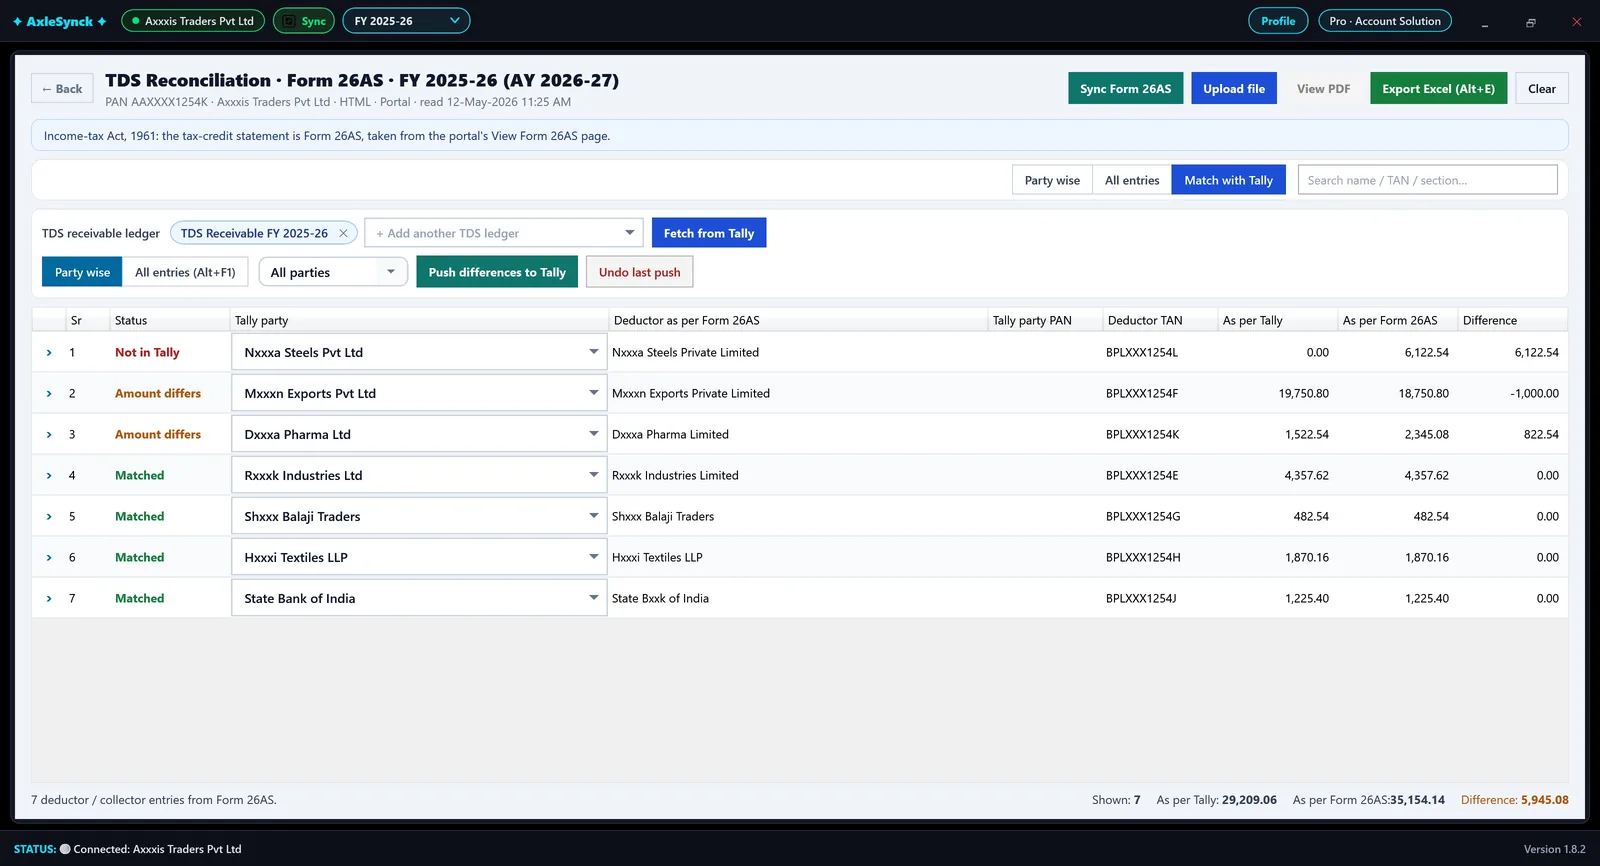
Match with Tally and push differences

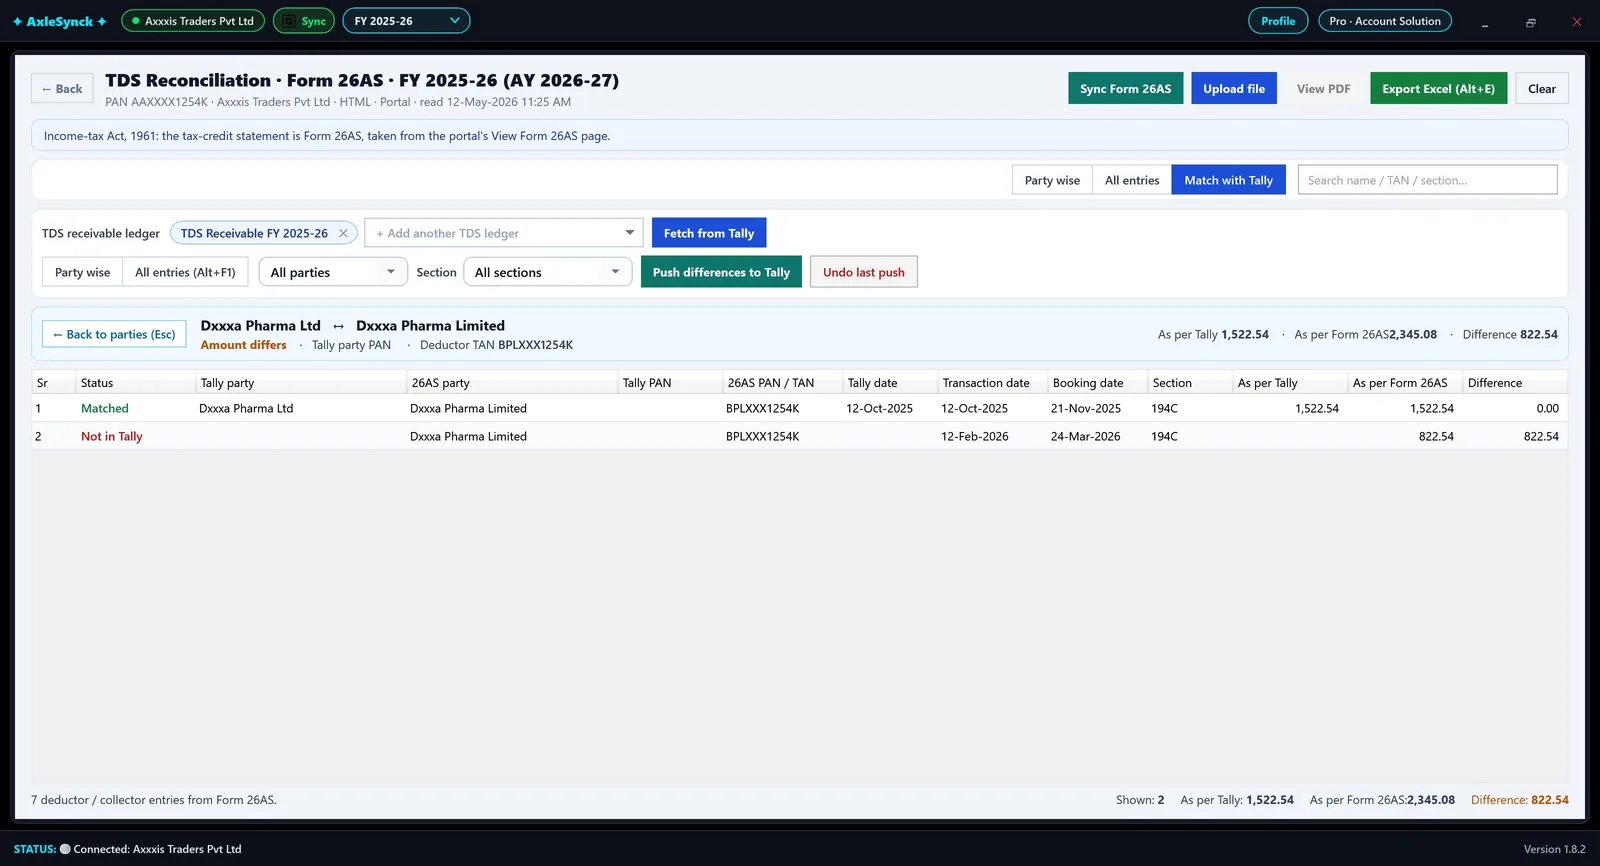
The statement against your TDS receivable ledger, party by party: what is matched, what differs, and what is missing in Tally, with the missing entries posted for you.

  1. Open Match with Tally

    Click Match with Tally.

  2. Pick the ledger

    Choose the TDS receivable ledger (add more than one if you use several), then Fetch from Tally. Every entry of the year is read with the party credited.

  3. Read the status

    Each party is Matched, Amount differs, Not in Tally or Not in Form 26AS. The Tally party is found by PAN and by name; change it in the dropdown if needed.

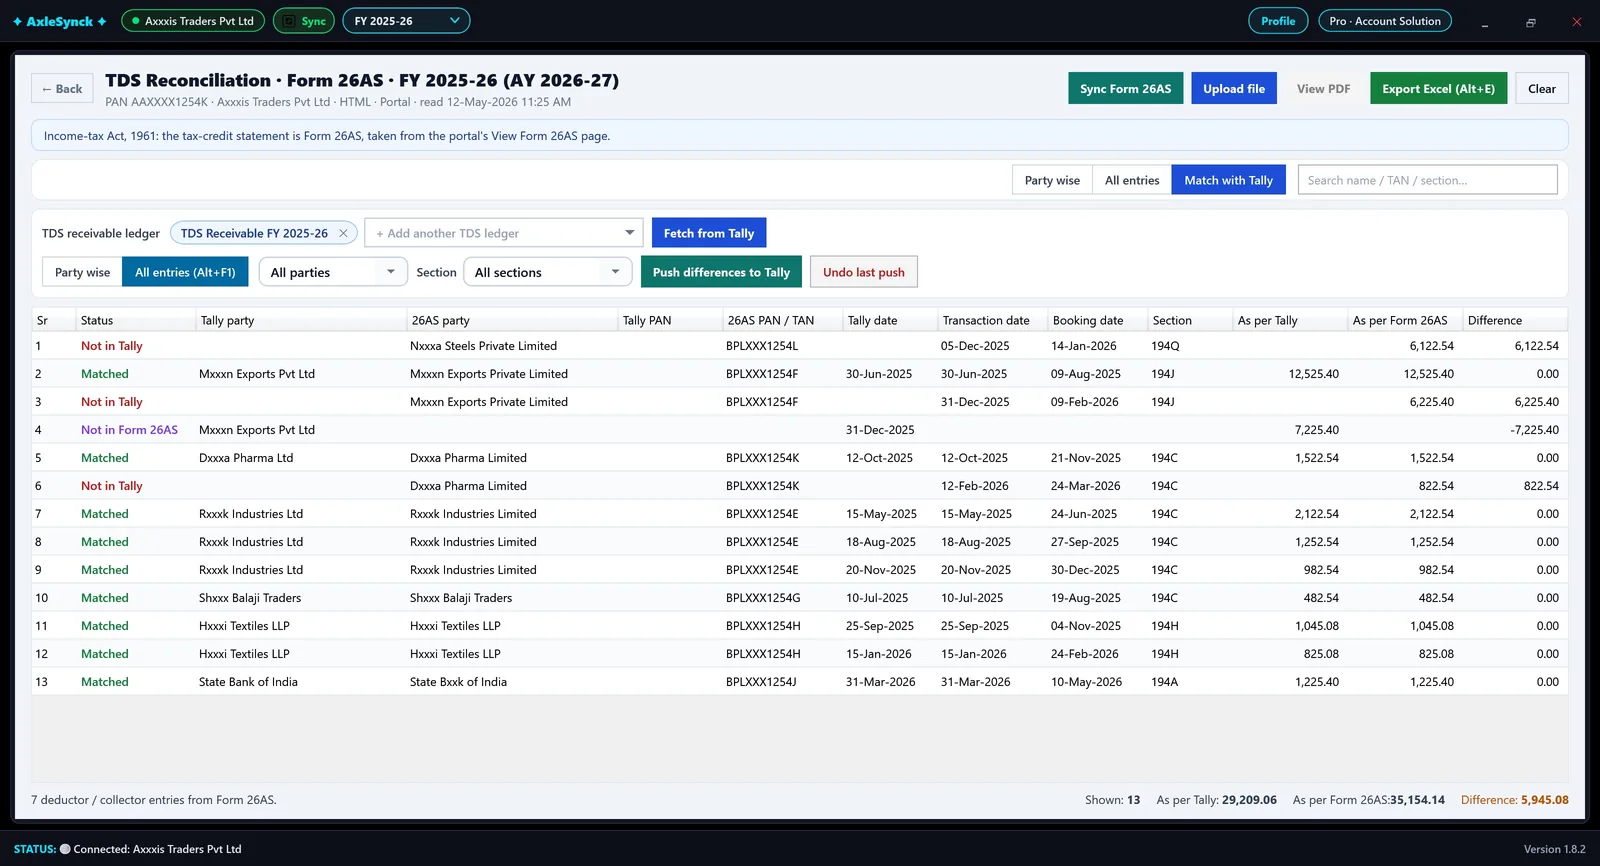
  4. See the entries

    Double-click a party for its entries; Esc goes back. All entries (Alt+F1) lists every entry, with a Section filter.

  5. Push the differences

    Push differences to Tally makes a journal (TDS ledger Dr, party Cr) for tax in the statement that is missing in Tally. You confirm before anything is sent; Undo last push takes it back.

AxleSynck: Match with Tally, party wise
Match with Tally, party wise
  1. 1Match with Tally
  2. 2TDS receivable ledger
  3. 3Fetch from Tally
  4. 4Status
  5. 5Tally party (found by PAN and name)
  6. 6Push differences to Tally
  7. 7Undo last push
AxleSynck: One party's entries
One party's entries
  1. 1Back to parties (Esc)
  2. 2The entry missing in Tally
AxleSynck: All entries
All entries
  1. 1All entries (Alt+F1)
  2. 2Section filter
Part 5 · 5 guides

Sales, purchase & more

Sales, purchase & more#

Sales entry from Excel

Fill AxleSynck's Excel template - one row per item, so an invoice with several items takes several rows - upload it, check the preview and push every invoice to Tally in one go. GST, round-off and totals are worked out for you.

You needTransaction module (Pro)
  1. Open Sales

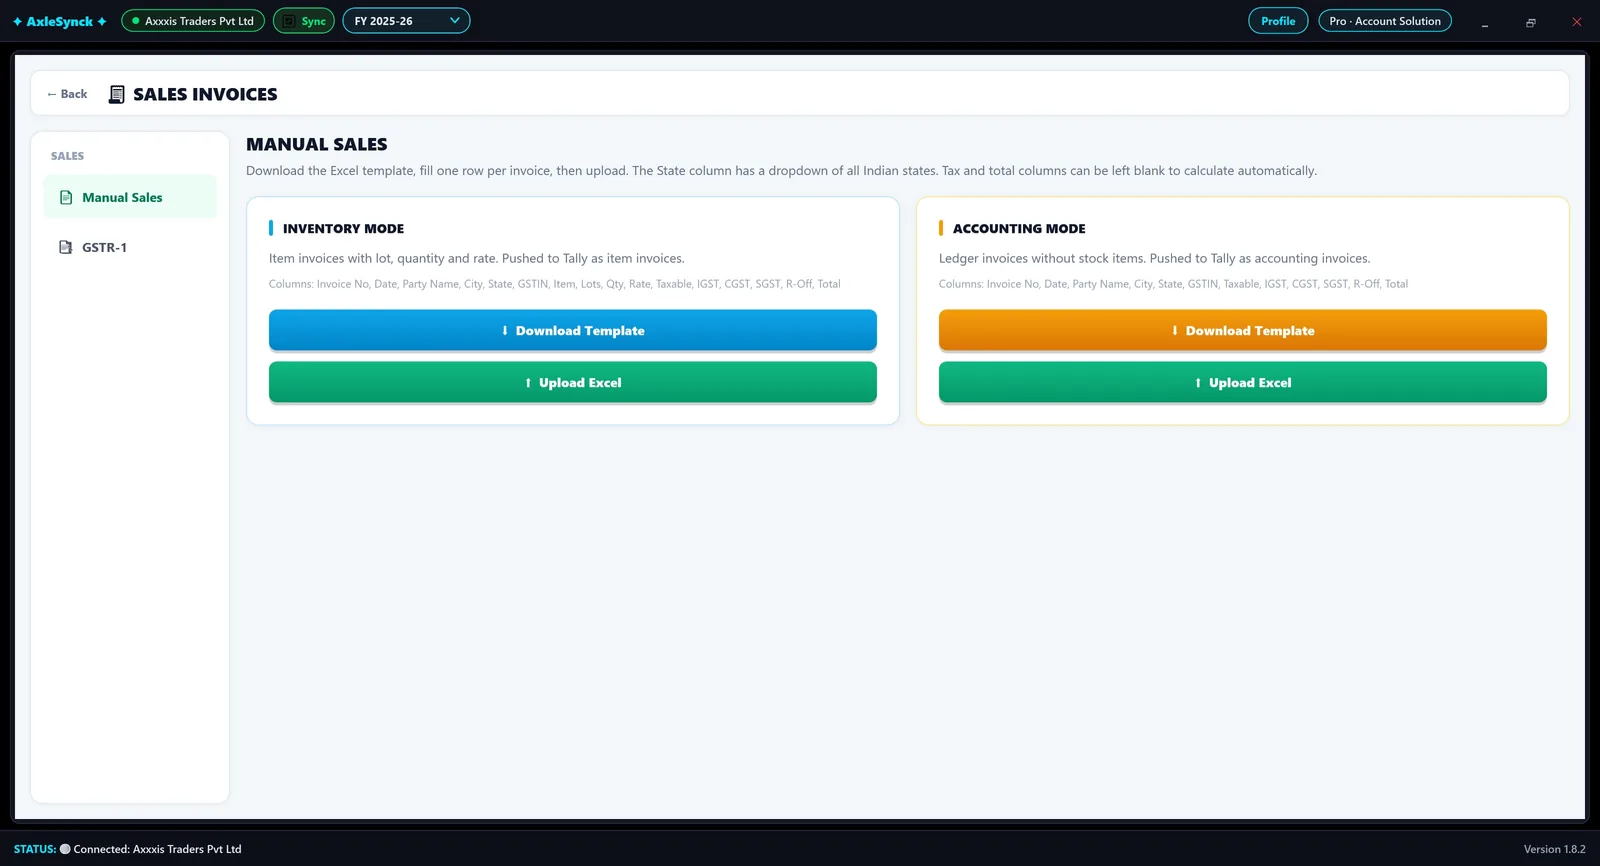
    Dashboard > Transaction > Sales, then Manual Sales.

  2. Choose the mode

    Inventory mode for item invoices (lot, quantity, rate). Accounting mode for ledger invoices without stock items.

  3. Fill the template

    Download Template: it opens with your company's name and GSTIN on top and 3 shaded sample invoices, which are never sent to Tally. Fill one row per item; rows with the same Invoice No are one invoice. The Item column lists your Tally stock items, GST % comes from the item, IGST or CGST + SGST from the party's state, and the tax and total columns are worked out and locked.
  4. Upload and check

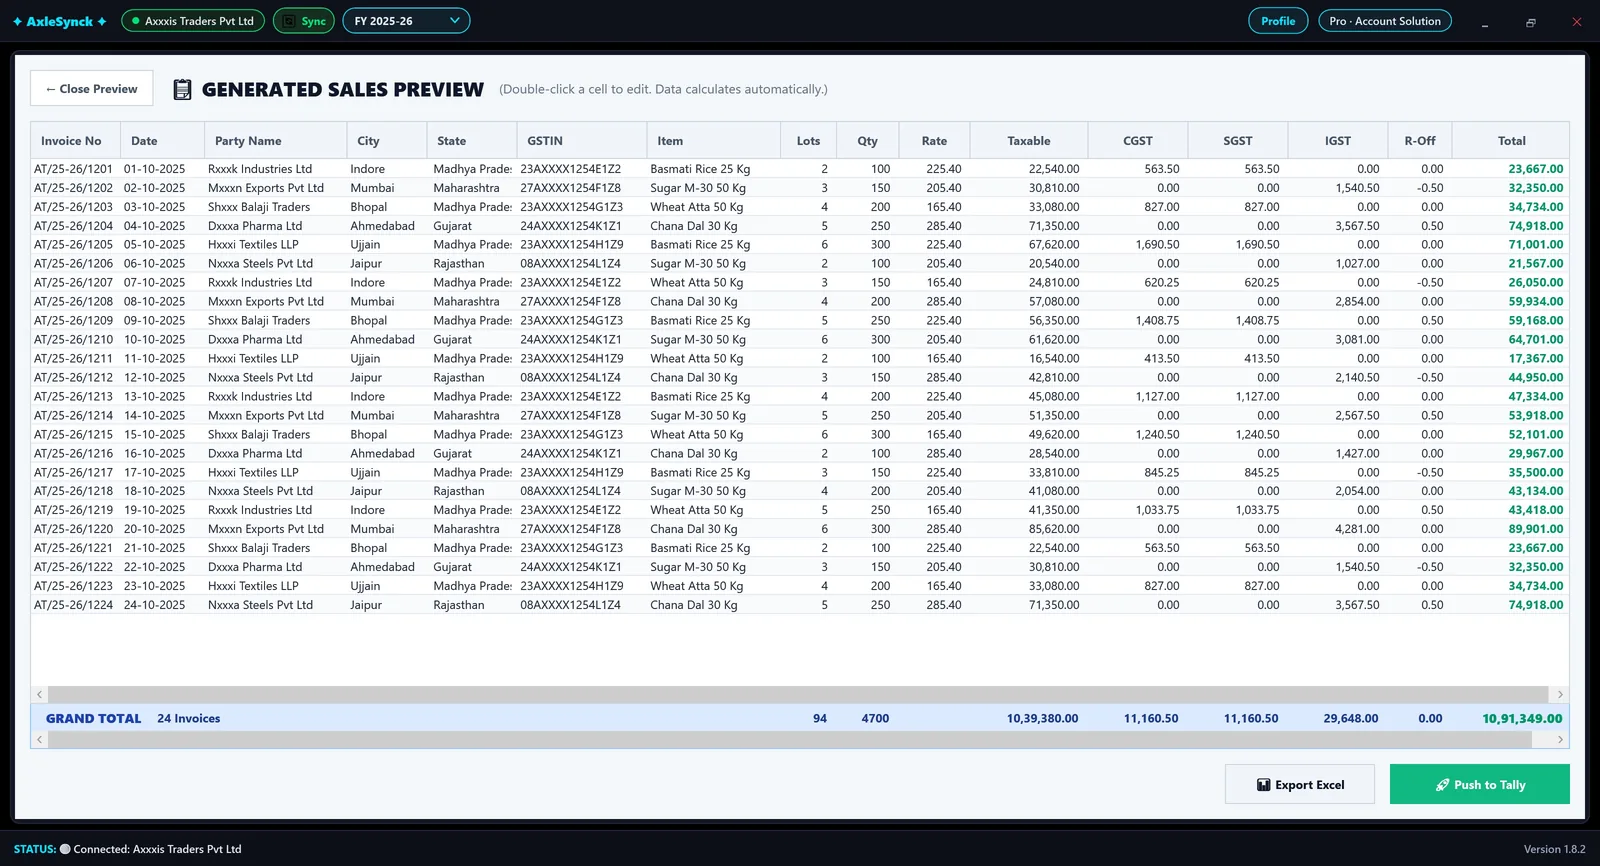
    Upload Excel checks the whole sheet first and lists every problem by row and column; nothing is taken in until it is right. Then the preview opens: double-click a cell to edit, and the totals recalculate.

  5. Push

    Push to Tally creates one voucher per invoice with all its items; Export Excel saves the preview. Dispatch, order, export and ship-to details can be switched on in Settings > Sales invoices.

AxleSynck: Sales > Manual Sales
Sales > Manual Sales
  1. 1Manual Sales
  2. 2Download Template (Inventory mode)
  3. 3Upload Excel
  4. 4Accounting mode: ledger invoices without stock items
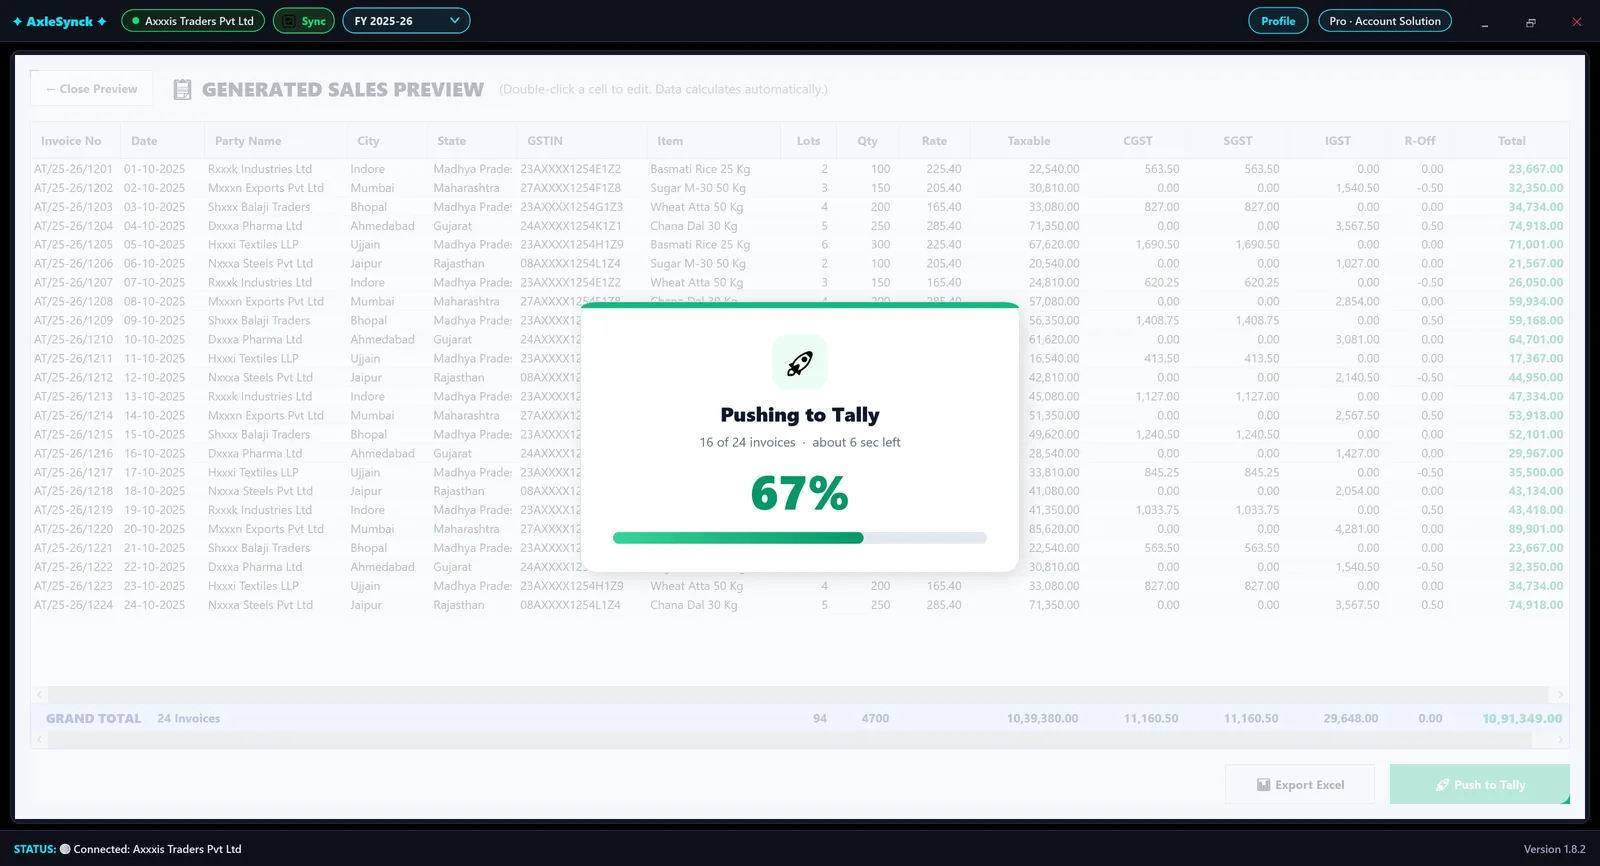
AxleSynck: The sales preview
The sales preview
  1. 1Double-click any cell to edit
  2. 2CGST, SGST and IGST worked out
  3. 3Round-off and total
  4. 4Grand total
  5. 5Export Excel
  6. 6Push to Tally
AxleSynck: Pushing to Tally
Pushing to Tally
  1. 1Progress and time left
Sales, purchase & more#

Purchase entry: GSTR-2B / 2A, or Manual Entry

Purchase bills come straight from GSTR-2B or GSTR-2A, each supplier is mapped to its Tally ledger by GSTIN, and the purchase vouchers are pushed to Tally with GST. Bills that are not in GSTR-2B - or that you keep in Excel - go in through Manual Entry.

You needTransaction module (Pro)GST portal login, or the JSON file from the portal
  1. Open Purchase

    Dashboard > Transaction > Purchase. Set the period with Alt+F2.

  2. Bring the bills

    Sync GSTR-2B (the monthly ITC statement, one total per bill) or Sync GSTR-2A (bill by bill, rate by rate), or Upload JSON from the portal.

  3. Map ledgers

    Suppliers already known are mapped by GSTIN. For the rest: search, tick the rows, type the ledger and Map selected. Unmapped shows what is left.

  4. New suppliers

    Create missing ledgers makes the ledgers that are not in Tally yet.

  5. Push

    Push to Tally posts the purchase vouchers. With Visible only on, only the rows shown after the filter are pushed.

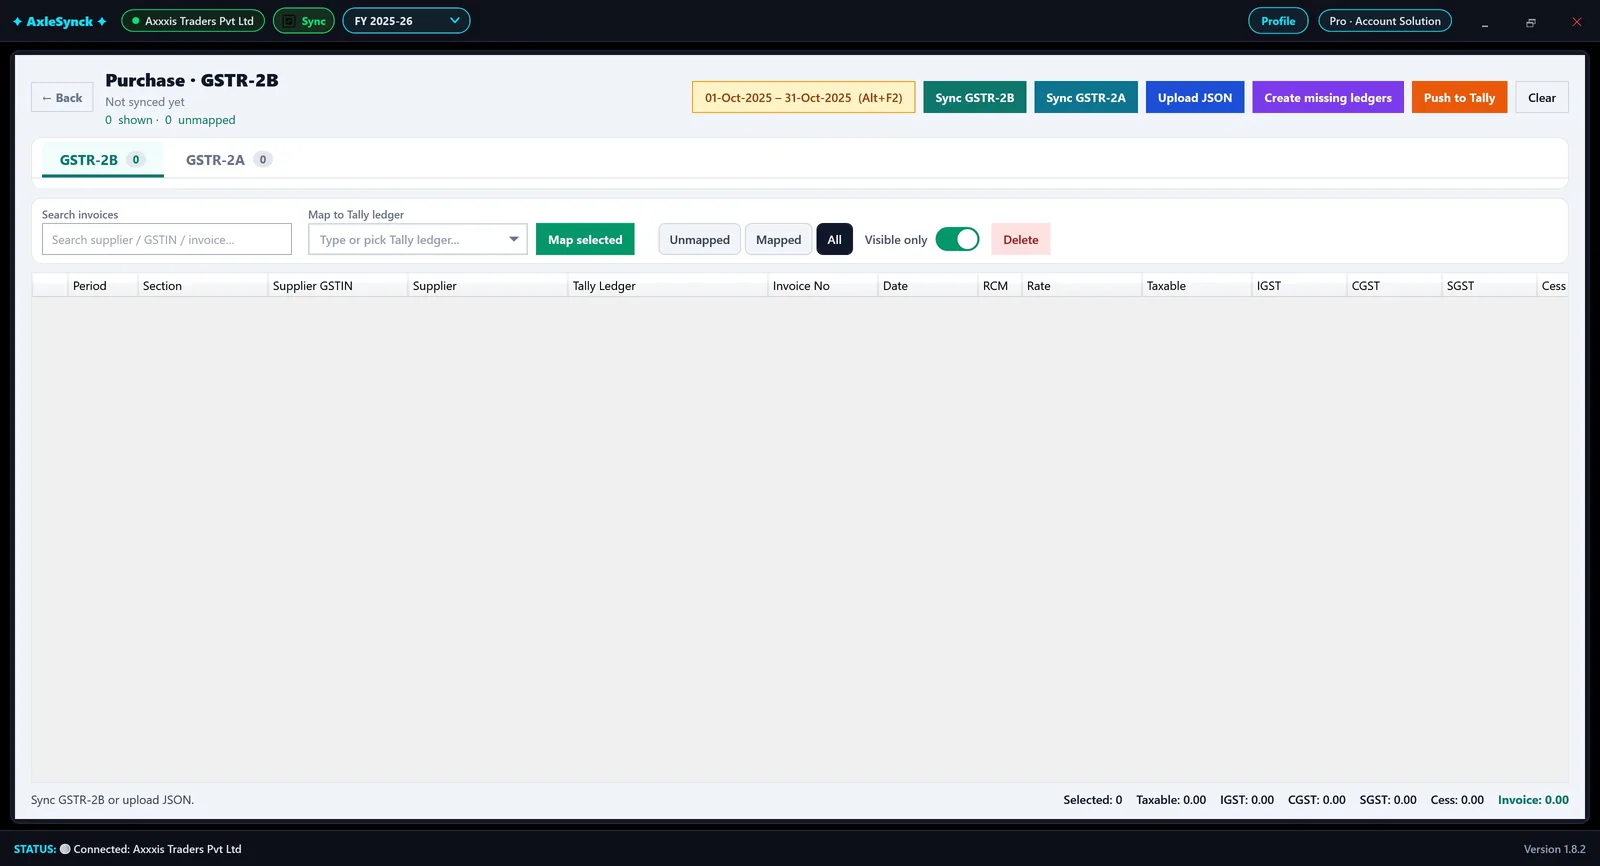
AxleSynck: Purchase before syncing
Purchase before syncing
  1. 1Period (Alt+F2)
  2. 2Sync GSTR-2B
  3. 3Sync GSTR-2A
  4. 4Upload JSON
  5. 5Create missing ledgers
  6. 6Push to Tally
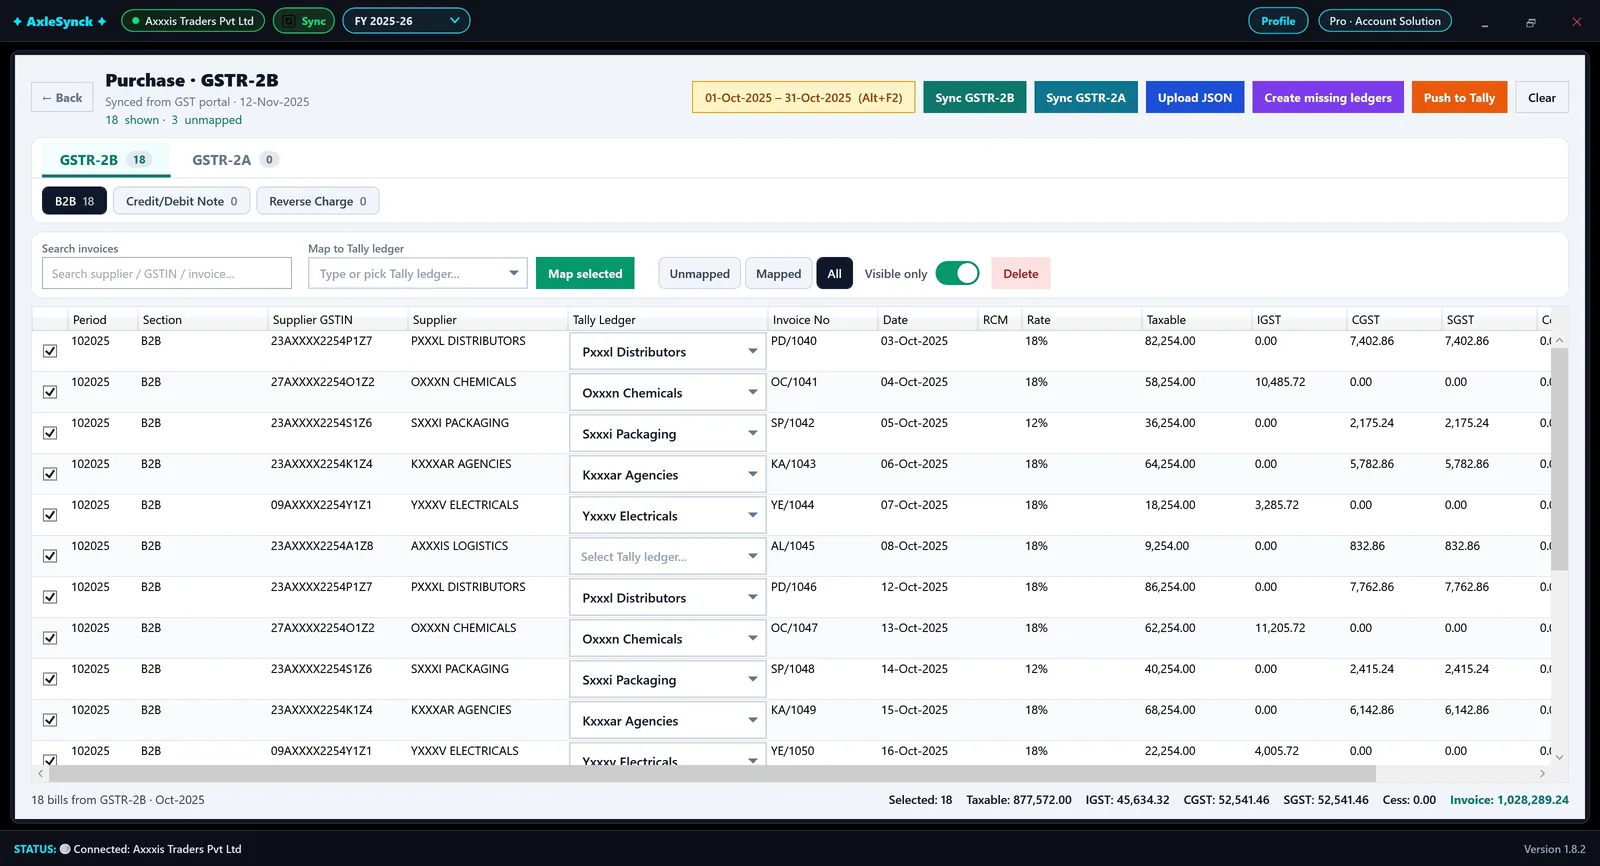
AxleSynck: Bills from GSTR-2B
Bills from GSTR-2B
  1. 1GSTR-2B / GSTR-2A
  2. 2Search supplier, GSTIN or invoice
  3. 3Tally ledger for the ticked rows
  4. 4Map selected
  5. 5Unmapped · Mapped · All
  6. 6Visible only
  7. 7A supplier with no ledger yet
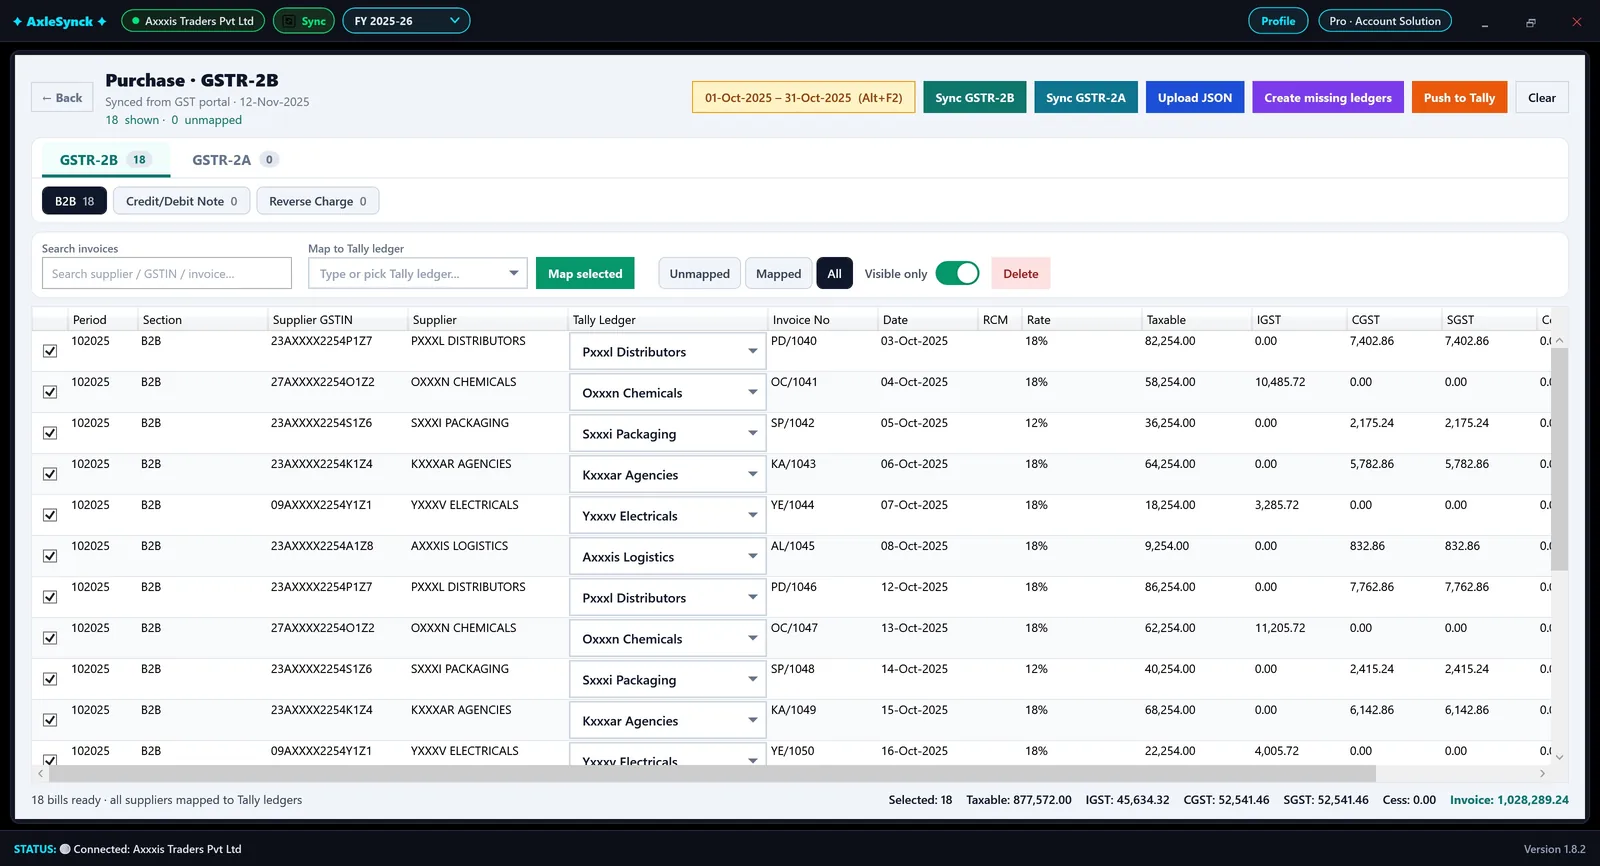
AxleSynck: Every supplier mapped, ready to push
Every supplier mapped, ready to push

Manual Entry: your own bills, pasted or typed

  1. Open Manual Entry

    The first tab on the Purchase screen: an Excel-like grid. Choose Accounting or Inventory mode.

  2. Bring the bills

    Paste a block copied from Excel (Ctrl+V), or Download Template, fill it and upload it.

  3. Set the ledgers

    Each row gets its Tally party ledger from the GSTIN when your Tally knows the party, and a purchase or expense ledger. Tick or filter rows and pick both ledgers to set them all at once; Alt+C creates a ledger that is missing.

  4. Push

    Push to Tally posts the bills. Totals sit under each column, and Undo last push and Push History work as for every push.

Sales, purchase & more#

Depreciation schedule and journals

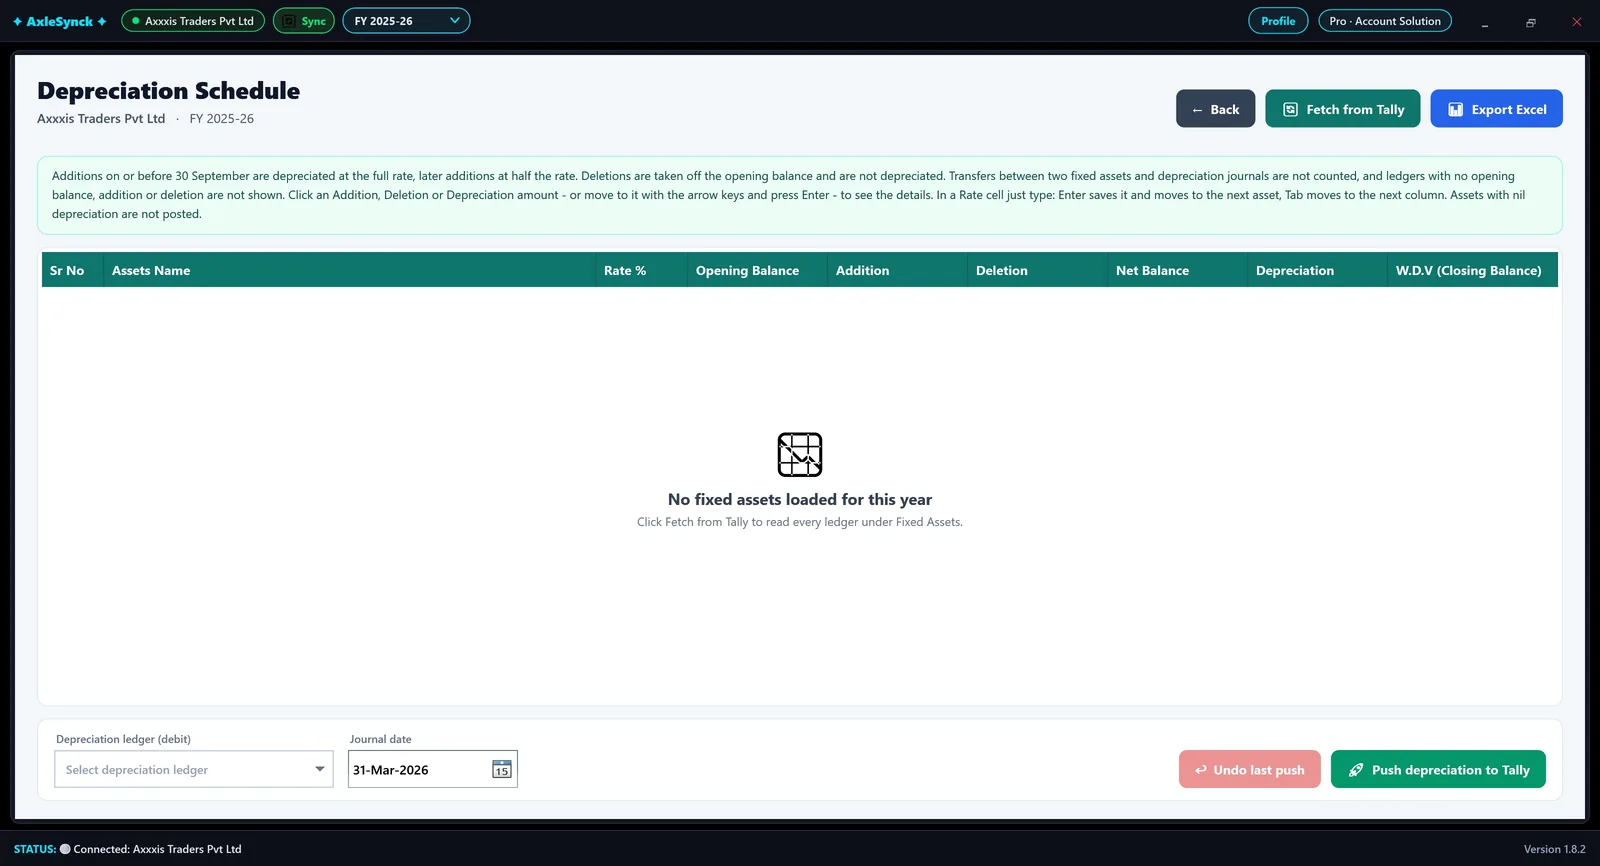
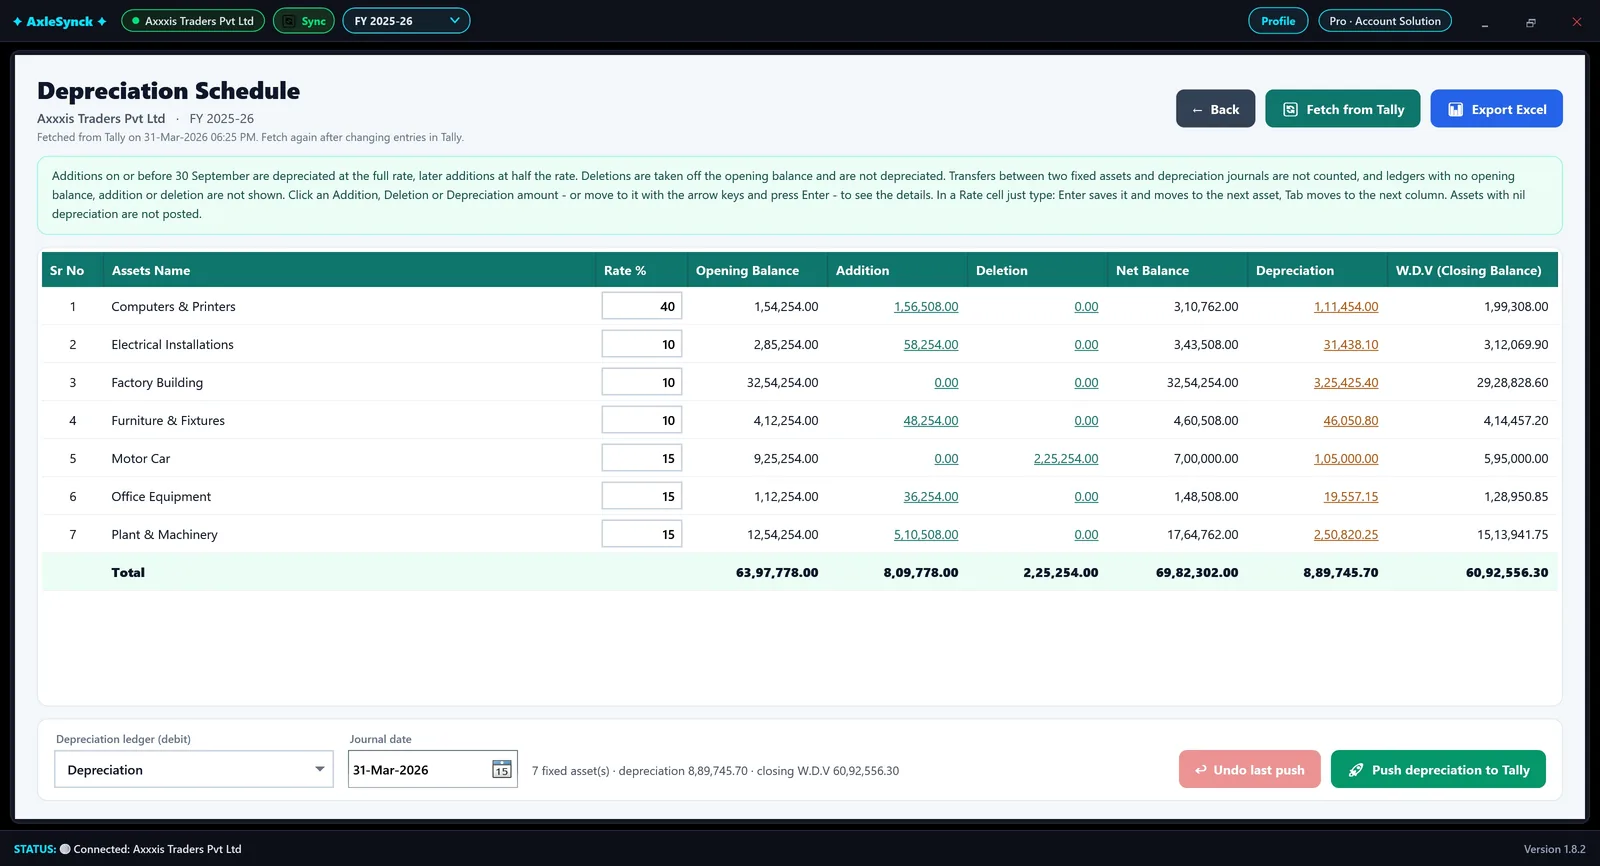
AxleSynck reads every fixed asset from Tally, works out WDV depreciation with the half-rate rule, and posts the journals back to Tally.
You needTransaction module (Pro)
  1. Fetch

    Dashboard > Transaction > Depreciation, then Fetch from Tally. Every ledger under Fixed Assets is read, with additions and deletions.

  2. Enter the rates

    Type the Rate % for each asset; it is saved for next time. Enter goes to the next asset, Tab to the next column.

  3. Check the schedule

    Additions on or before 30 September get the full rate, later additions half. Deletions come off the opening balance and are not depreciated. Click an Addition, Deletion or Depreciation amount to see its details.

  4. Post the journals

    Pick the Depreciation ledger (debit) and the Journal date, then Push depreciation to Tally. Undo last push deletes those journals.
AxleSynck: Depreciation before fetching
Depreciation before fetching
  1. 1Fetch from Tally
AxleSynck: The depreciation schedule
The depreciation schedule
  1. 1Rate %
  2. 2Additions
  3. 3Deletions (sales)
  4. 4Depreciation
  5. 5W.D.V (closing balance)
  6. 6Depreciation ledger (debit)
  7. 7Journal date
  8. 8Undo last push
  9. 9Push depreciation to Tally
  10. 10Export Excel

Transfers between two fixed assets and existing depreciation journals are not counted, and assets with nil depreciation are not posted.

Sales, purchase & more#

Delivery challan

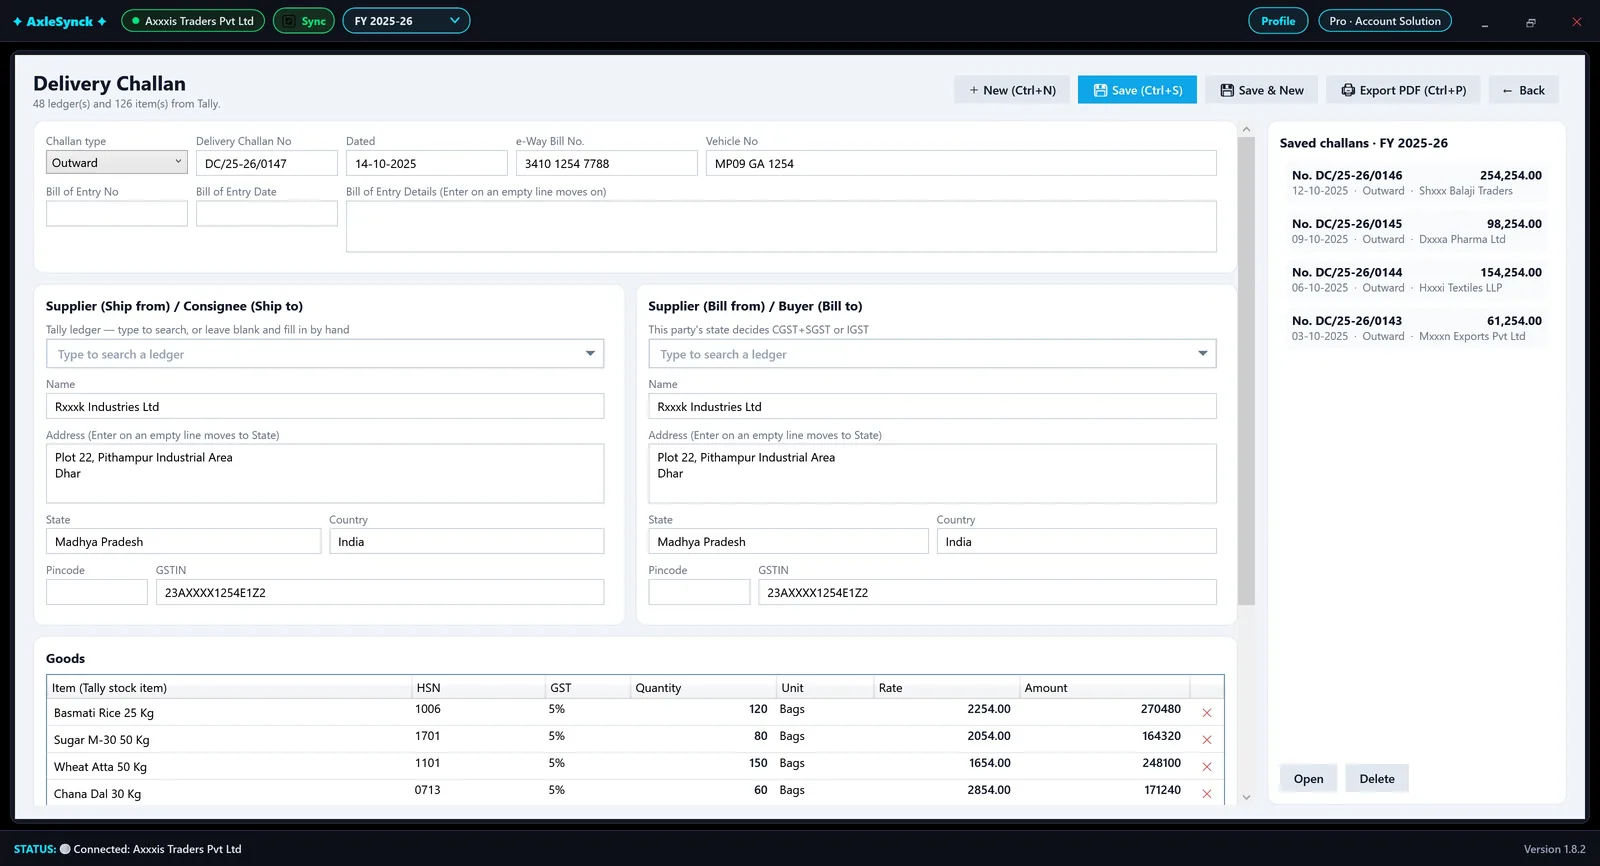
Write inward or outward delivery challans with parties and items from Tally. GST is worked out from the billing party's state, and the challan is saved and printed as a PDF.
You needTransaction module (Pro)
  1. Open Delivery Challan

    Dashboard > Transaction > Delivery Challan.

  2. Fill the header

    Challan type (Inward / Outward), number (it runs on by itself for the year), date (12.3, 9/12 or 09-09-2026 all work), e-Way Bill No., Vehicle No. and Bill of Entry details.

  3. Parties

    Type to search a Tally ledger for Ship from / Ship to and Bill from / Bill to, or fill them in by hand. The billing party's state decides CGST + SGST or IGST.

  4. Goods

    Pick a Tally stock item (HSN, GST rate and unit fill in), then the quantity and rate. Tick Add GST (Space) if the challan carries tax.

  5. Save and print

    Save (Ctrl+S), Save & New or Export PDF (Ctrl+P). Saved challans appear on the right to open or delete.

AxleSynck: A delivery challan
A delivery challan
  1. 1Challan type: Inward / Outward
  2. 2Challan number
  3. 3e-Way Bill No.
  4. 4Vehicle No.
  5. 5Ship from / to: search a Tally ledger
  6. 6Bill from / to: decides CGST + SGST or IGST
  7. 7Goods: Tally stock items
  8. 8Save (Ctrl+S)
  9. 9Export PDF (Ctrl+P)
  10. 10Saved challans

Under Printed header you can print your own company name, address and PAN instead of the Tally company's.

Sales, purchase & more#

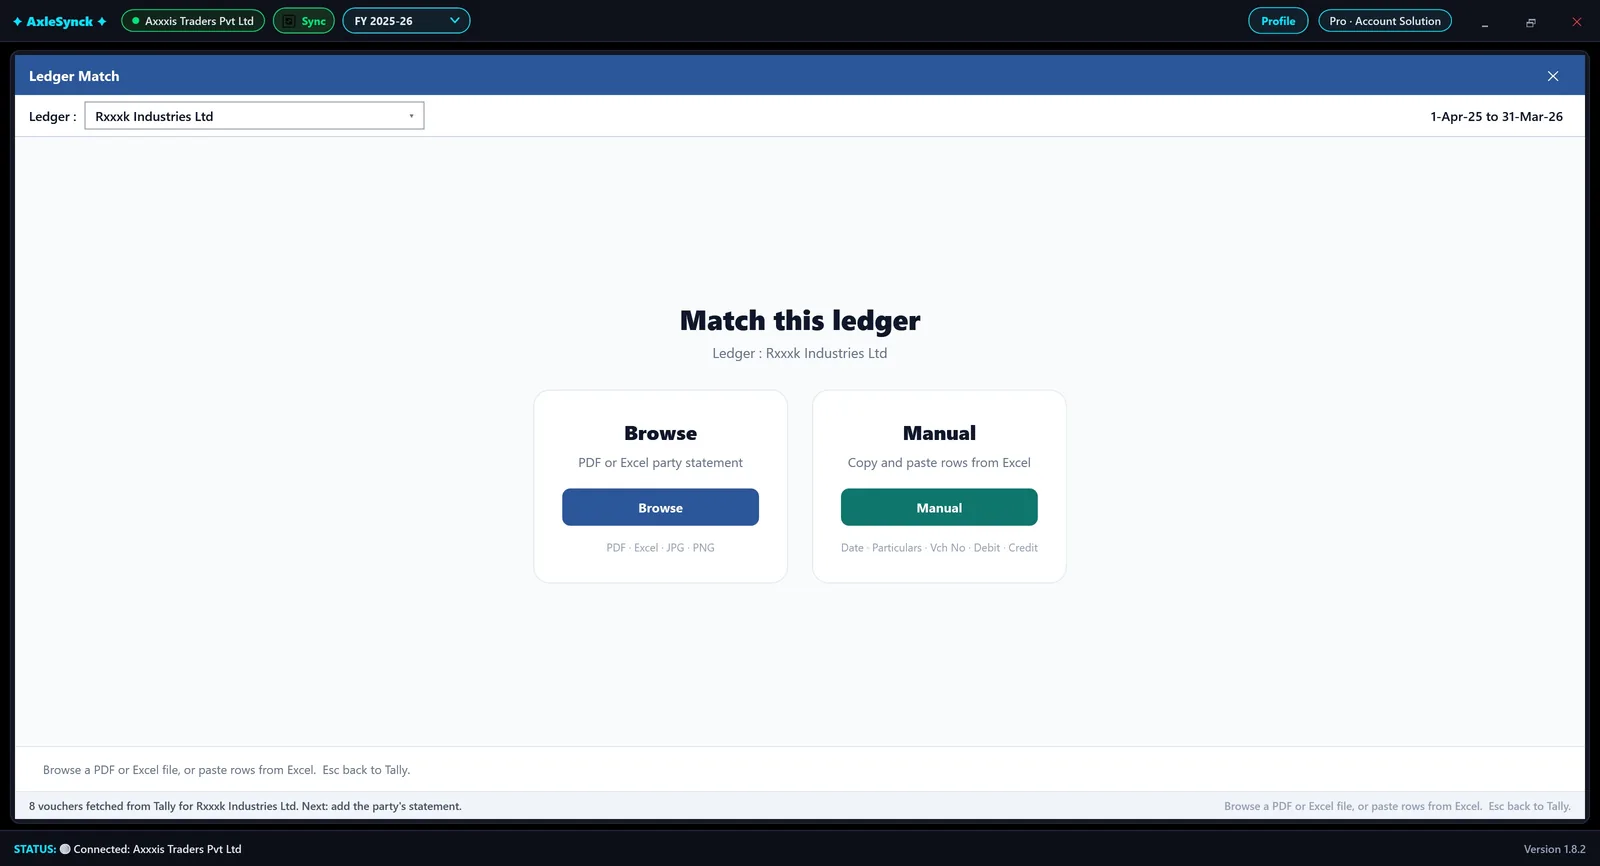
Ledger Match: party statement vs Tally

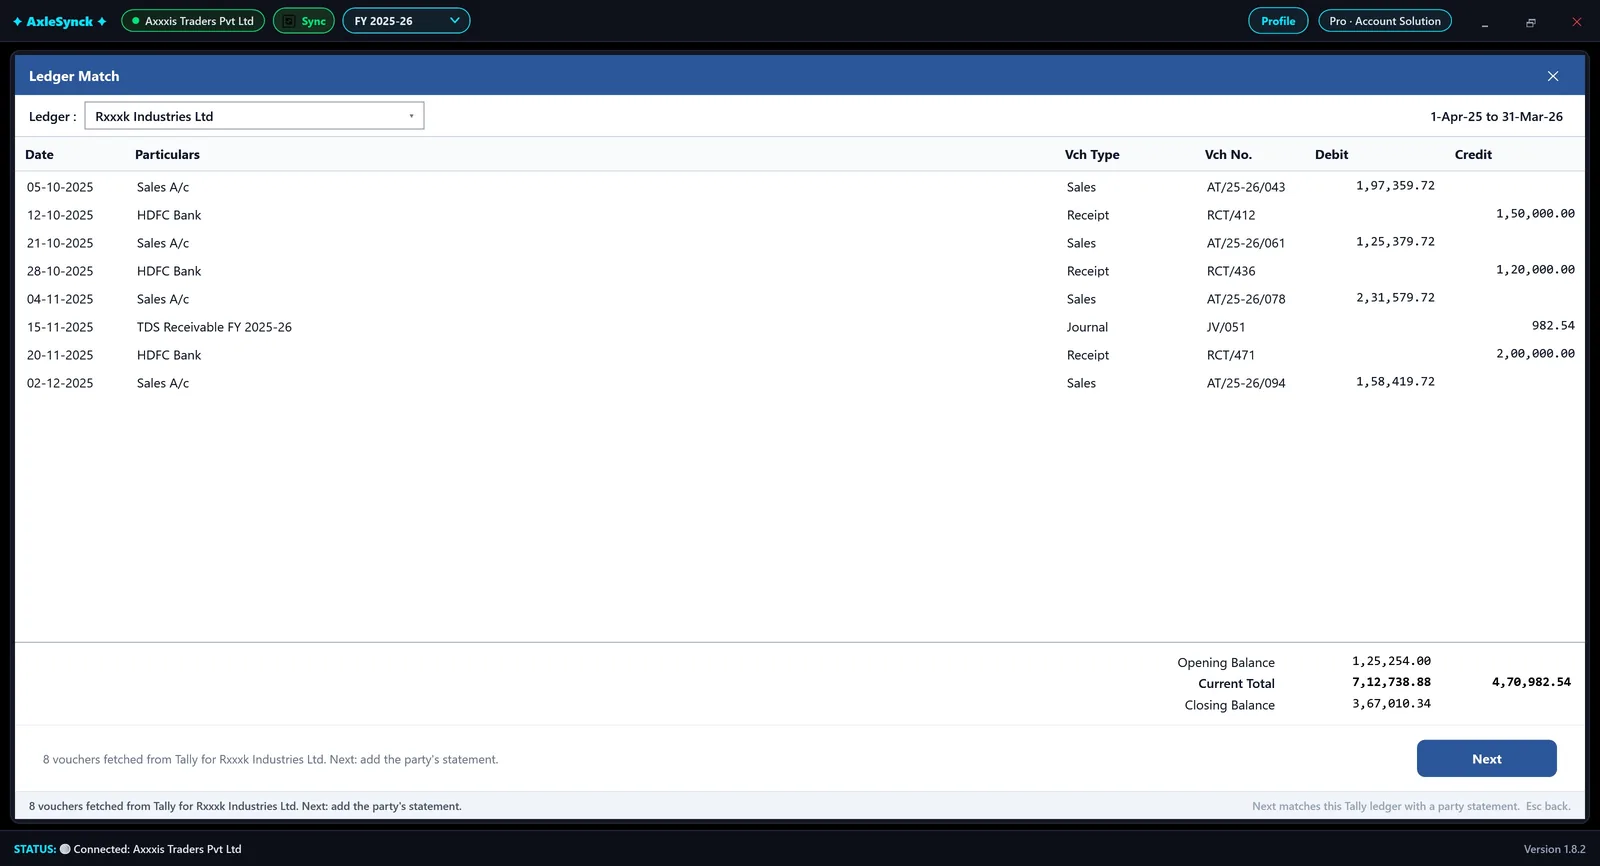
Match a party's ledger in Tally with the statement the party sent you: matched entries, entries missing on either side and amount differences, with a reconciliation statement.

You needLedger Match (Pro)
  1. Start

    Dashboard > Ledger Match > New reconciliation.

  2. Pick the ledger

    Type to search the party's ledger. Its vouchers for the period come from Tally (change the period with Alt+F2). Click Next.

  3. Add the party's statement

    Browse a PDF, Excel, JPG or PNG statement, or Manual to paste rows from Excel (Date, Particulars, Vch Type, Vch No., Debit, Credit, and the opening / closing balance).

  4. Read the result

    Filter by Matched, Not in Tally, Only in Tally or Amount differs, and read the reconciliation statement.

  5. Keep it

    Export Excel writes the Tally, statement and reconciliation sheets; Save keeps the match to open later.

AxleSynck: The party's ledger from Tally
The party's ledger from Tally
  1. 1Ledger: type to search
  2. 2Period (Alt+F2)
  3. 3Vouchers from Tally
  4. 4Opening, current total and closing balance
  5. 5Next
AxleSynck: Add the party's statement
Add the party's statement
  1. 1Browse: PDF, Excel, JPG or PNG
  2. 2Manual: paste rows from Excel
Part 6 · 4 guides

Tools & settings

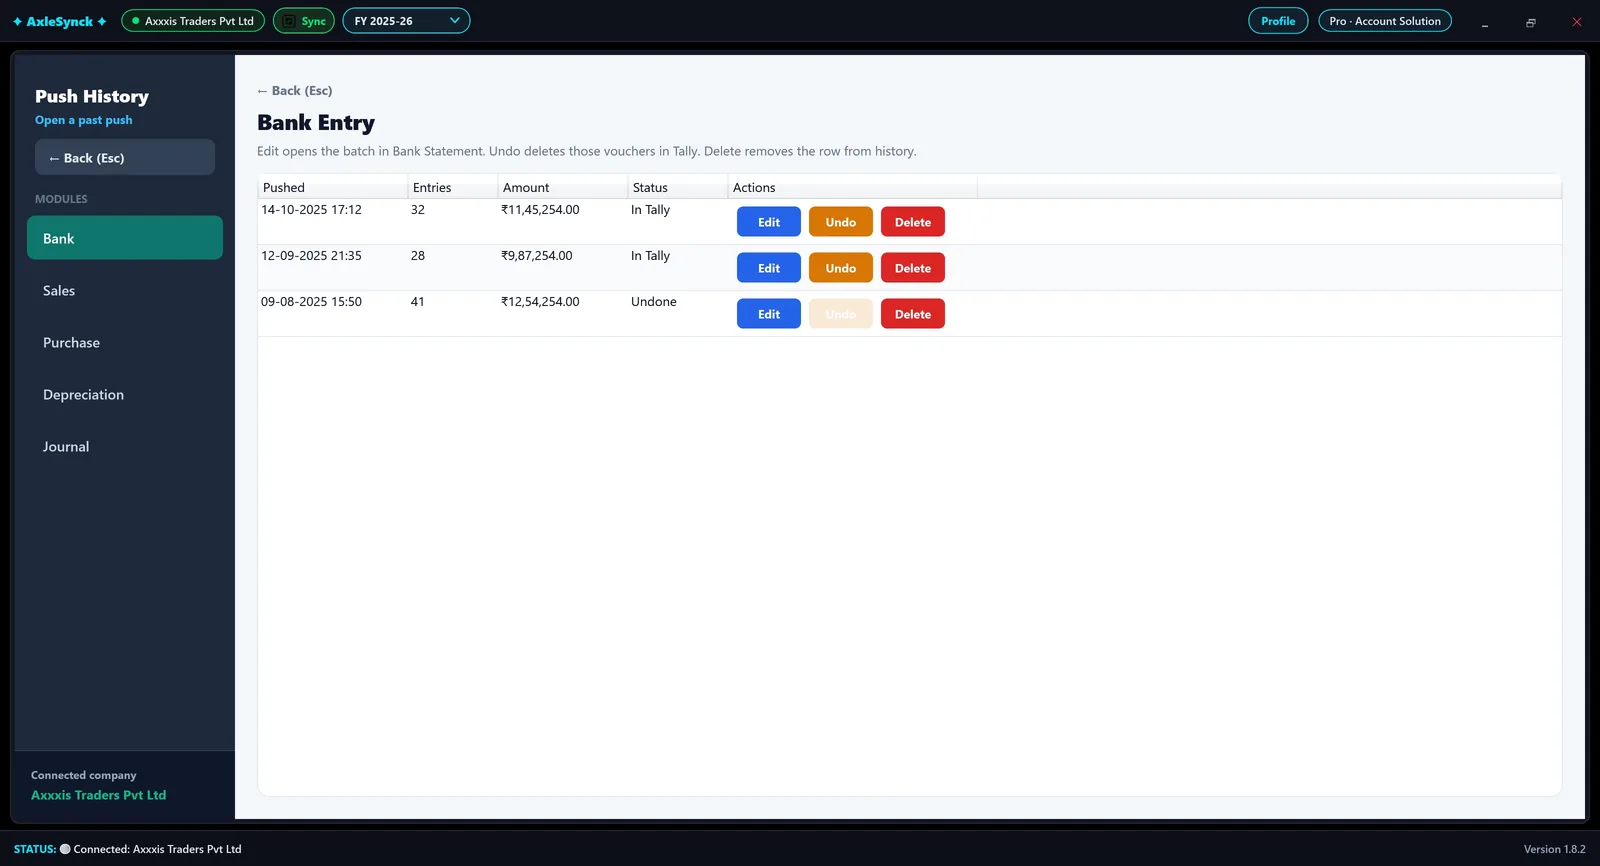
Tools & settings#

Push History: edit or undo a push

Every push to Tally is kept as a batch, by module. Open it again, or take the whole batch back out of Tally.
  1. Open Push History

    From the dashboard click Push History and pick the module: Bank, Sales, Purchase, Depreciation or Journal.

  2. Edit

    Edit opens the batch again (for a bank batch, in Bank Statement).

  3. Undo

    Undo deletes that batch's vouchers in Tally; the status becomes Undone.

  4. Delete

    Delete removes the row from the history only.
AxleSynck: Push History
Push History
  1. 1Module
  2. 2Status: In Tally, Partial or Undone
  3. 3Edit
  4. 4Undo: deletes the vouchers in Tally
  5. 5Delete from history
Tools & settings#

PDF Tools: unlock and merge PDFs

Unlock password-protected PDFs (when you know the password) or merge several PDFs into one. Free, and no licence needed.

  1. Open PDF Tools

    From the dashboard click PDF Tools (Unlock / Merge).

  2. Unlock or merge

    Choose Unlock and give the PDF's password to save a copy without it, or Merge to join PDFs into one file.

Tools & settings#

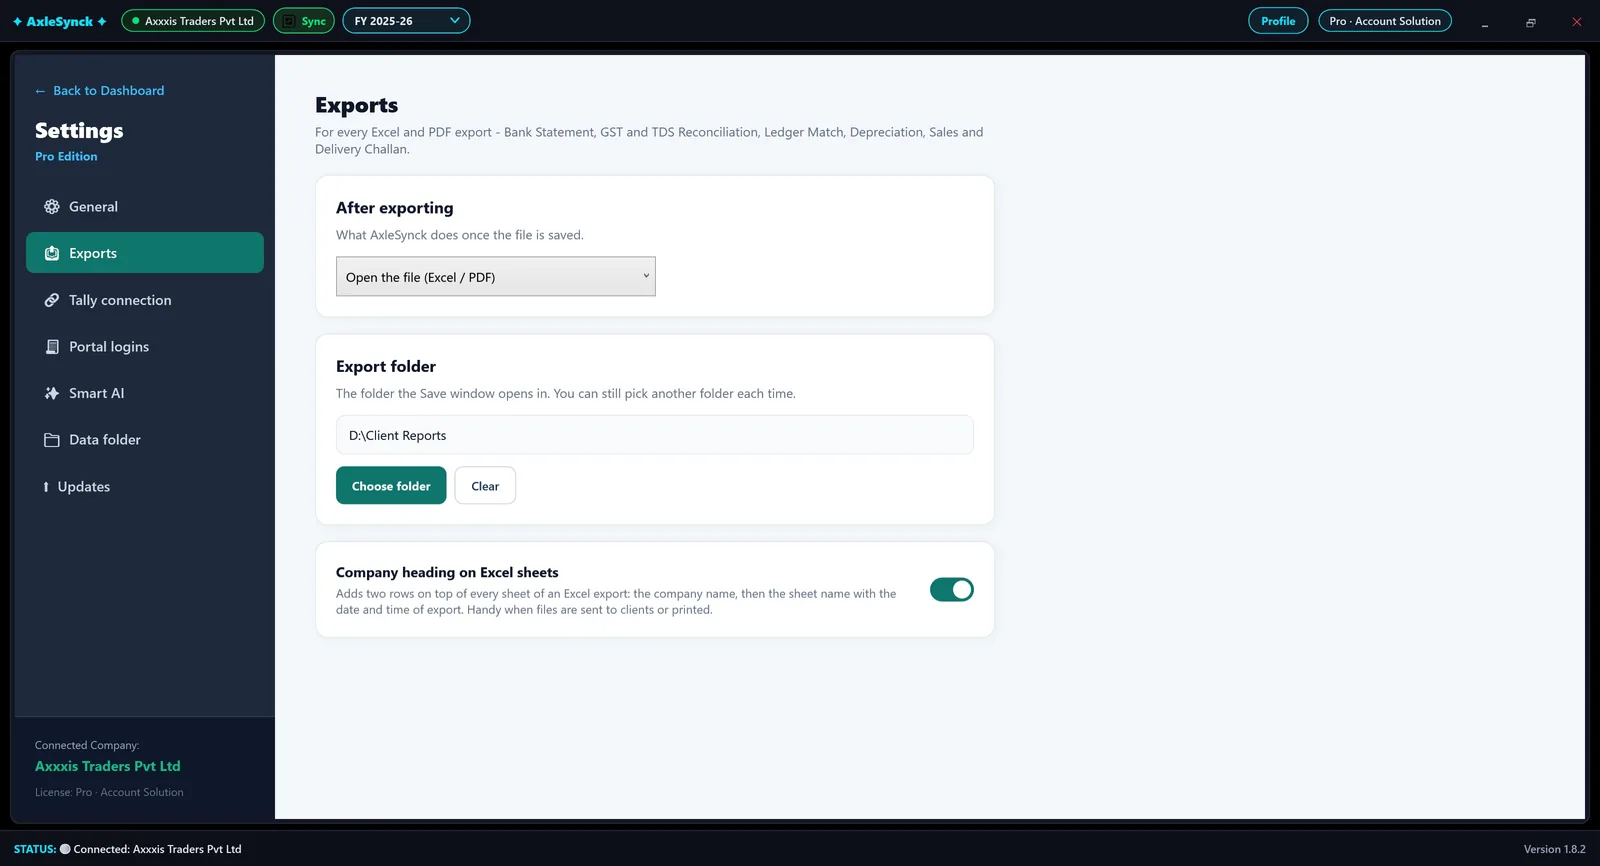
Settings: exports, logins, backup and updates

Settings decide how AxleSynck opens, where exports go, which portal logins are saved, where your data is kept and backed up, and how updates arrive.

  1. General

    Start page, the financial year when AxleSynck opens, and full screen.

  2. Exports

    What happens after an export (open the file…), the folder the Save window opens in, and a company heading on top of every Excel sheet.

  3. Portal logins

    GST portal and Income-tax portal logins, saved per company in its data folder and filled in for you. You still type the captcha or OTP.

  4. Data folder and backup

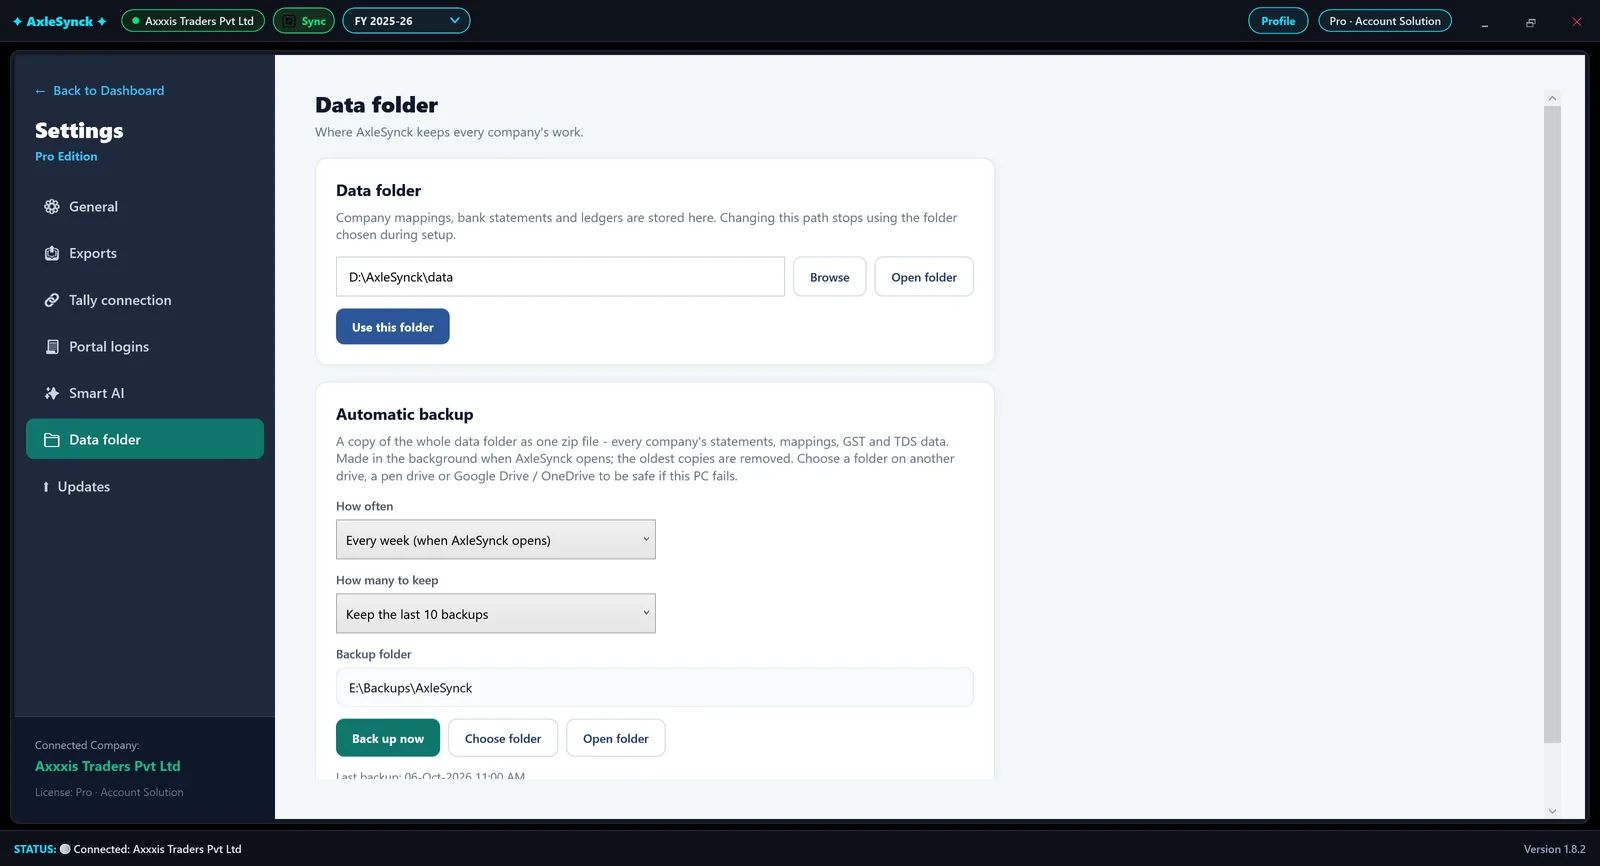
    Where every company's work is kept, and an automatic zip backup: how often, how many to keep, and a folder on another drive, a pen drive or Google Drive / OneDrive. Back up now makes one at once.

  5. Updates

    Check for updates, and Roll back to previous version if something stopped working after an update; your data is kept.

AxleSynck: Settings > Exports
Settings > Exports
  1. 1After exporting
  2. 2Export folder
  3. 3Company heading on Excel sheets
AxleSynck: Settings > Data folder and automatic backup
Settings > Data folder and automatic backup
  1. 1Data folder
  2. 2How often
  3. 3How many to keep
  4. 4Backup folder: pick another drive
  5. 5Back up now
Tools & settings#

Troubleshooting

The questions we are asked most, and what to check first.

  1. Tally not connected

    Keep Tally open with the company loaded, check F1 > Settings > Connectivity (port 9000), then Test connection in Settings > Tally connection.

  2. Tally on cloud not connected

    The AxleSynck Connector must be open on the cloud computer. See Tally on cloud.

  3. A module is locked

    Activate this PC in Profile. Sales, Purchase, Depreciation, Delivery Challan, Ledger Match, GST and TDS need a Pro licence.

  4. The statement asks for a password

    Type the PDF's password when asked; AxleSynck opens it on your computer.

  5. The portal asks for a captcha or OTP

    That is normal: logins are filled in for you, but the captcha (GST) or OTP (Income-tax) is always typed by you.

  6. No fixed assets loaded

    Click Fetch from Tally on the Depreciation screen; only ledgers under Fixed Assets are read.

  7. Still stuck?

    Write to support@axlesynck.in or message us on WhatsApp.

Still have a question?

Ask us on WhatsApp or send an enquiry, and we will show you on your own Tally company.